

In this part 5 of the Node/Express.js learning series, we will look at how to implement REST APIs on Node & Express. We will leverage our earlier know-how on the AJAX calls and Cassandra database to build a demo server app that defines and exposes a set of REST APIs to be invoked by the clients.
What is Rest?
REST stands for Representational state transfer which essentially refers to a style of web architecture that has many underlying characteristics and governs the behavior of clients and servers.
Can’t understand REST?? Then read this
A REST API defines a set of functions upon which, the developers can perform requests and receive responses via HTTP protocol, such as GET and POST. Because REST APIs use HTTP, they can be used from any programming language and are easy to test.
If you still cannot understand REST, then, well, it is not your fault. The phrase “Representational State Transfer” is not that straight forward to grasp at the first go.
Let me give you an example. In the early days of Internet, all the URLs on a website were essentially pointing to html files on the server’s hosting root directory. So imagine you had a website for book rentals, called www.bookmybook.com. Your website offered rental services for books and also acted as an aggregator for visitors to enlist their books for renting. If designed during the Web 1.0 era, your website URLs would have looked something like this.
View book catalog: www.bookmybook.com/view_books.html
Add book: www.bookmybook.com/add_book.html
Modify book: www.bookmybook.com/modify_book.html
Delete book: www.bookmybook.com/del_book.html
So essentially, you would have designed each html page to offer the specific service to the users. For most pages, it was mostly an .html file handling the user’s request but we also require dynamic content for which we could use PHP or ASP.
With REST, there is a shift in the way we think about the URL. We are no longer limiting ourselves to the physical files in the server, but extending the URL to include the virtual assets (or states) of the server system. So if we design the same website in RESTfull way then the URLs would look something like this.
View book catalog: www.bookmybook.com/books
Add book: www.bookmybook.com/book/add
Modify book: www.bookmybook.com/book/modify/<book_id>
Delete book: www.bookmybook.com/book/delete/<book_id>
Here book_id is a unique number identifying the book within the catalog. Notice how the URL now represents the assets (the books) and their operational states (add/modify/delete) within the system ( the server application managing the books catalog). This is the power of REST. Using this, we can define our own URLs that act as API endpoints and then the client apps can interact with the server using those API endpoints.
In this post, we’ll create a basic REST API using Node.js and Express, on the similar lines as the above example, which retrieves data from Cassandra database and gives a response to the client in JSON format.
Basic HTTP methods for RESTful services
A RESTful API uses HTTP verbs to represent actions to be performed on the server.
- POST
- GET
- PUT
- DELETE
We will create a simple Express application that manages the book catalog for a book rental store.We’ll use chrome Postman plugin to test our REST APIs.
As you will see, the basic foundation of building the REST APIs is based on AJAX calls that we learned in an earlier post. We are just organizing the URL in a way that it logically fits the service that we are offering to the client. Let’s get started with the demo.
Rest API Demo for Book Rental Service
So we have this hypothetical use case where there is a book rental service that acts as an aggregator. By using the REST API, we are enabling the users of the aggregator platform to invoke the services with ease.
Let’s build the REST API for basic management of the book catalog, that is, show, add, view, update and delete books. Demo source code is available in this GutHub repo. Make sure that you setup your Node.js project directory and install the dependencies. Also, you must have Cassandra database installed and running as we learned in the last post.
Once your Node environment is set up, the application can be executed using this command
DEBUG=rest:* npm start
Database Initialization and Connection
The database schema and the initial data (books catalog) for this demo are available in this cql file. You can load this into your Cassandra instance using the cqlsh command line tool.
cqlsh -u '<username>' -p '<password>' -f <path>/booksCatalog.cql
And the database connection is initiated in the index.js file that also defines the routes for this application.
var cassandra         = require("cassandra-driver");

var dbConfig = {
         contactPoints : ['127.0.0.1'],
         keyspace:'booklist'
    };

var connection = new cassandra.Client(dbConfig);

connection.connect(function(err,result){
    console.log('cassandra connected');
});
Five REST Endpoints
We have defined five REST endpoints. The routes are defined in this file under the source code repo.
- Listing all books in the catalog ( /books )
- Adding a book to the catalog ( /book/add/<book_id> )
- Viewing a book in the catalog ( /book/view/<book_id> )
- Updating a book detail in the catalog ( /book/modify/<book_id> )
- Deleting a book from the catalog ( /book/delete/<book_id> )
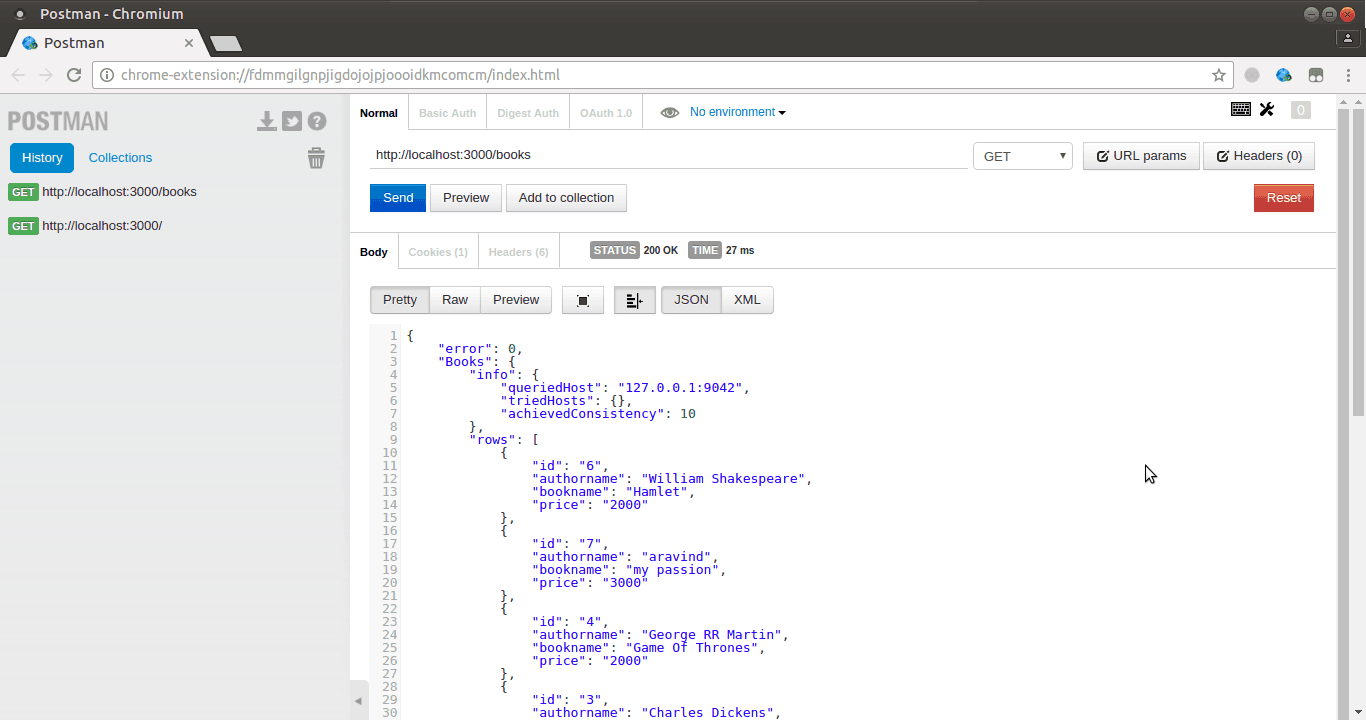
Listing all books in the catalog
To list down all books available in the catalog, we can use the HTTP GET method. And its route URL invocation will be defined as router.get(‘/books’,function()) .
[code language=”javascript”]
router.get(‘/books’,function(req,res){
var data = {
"error":1,
"Books":"";
};
var select = "SELECT * from books";
connection.execute(select,function(err, rows){
if(rows.length != 0){
data["error"] = 0;
data["Books"] = rows;
res.json(data);
}else{
data["Books"] = ‘No books Found..’;
res.json(data);
}
});
});
[/code]
Executing this route will fetch all the books from the catalog and returned as JSON. Here is how you can test it using Postman add-on under Chrome browser.
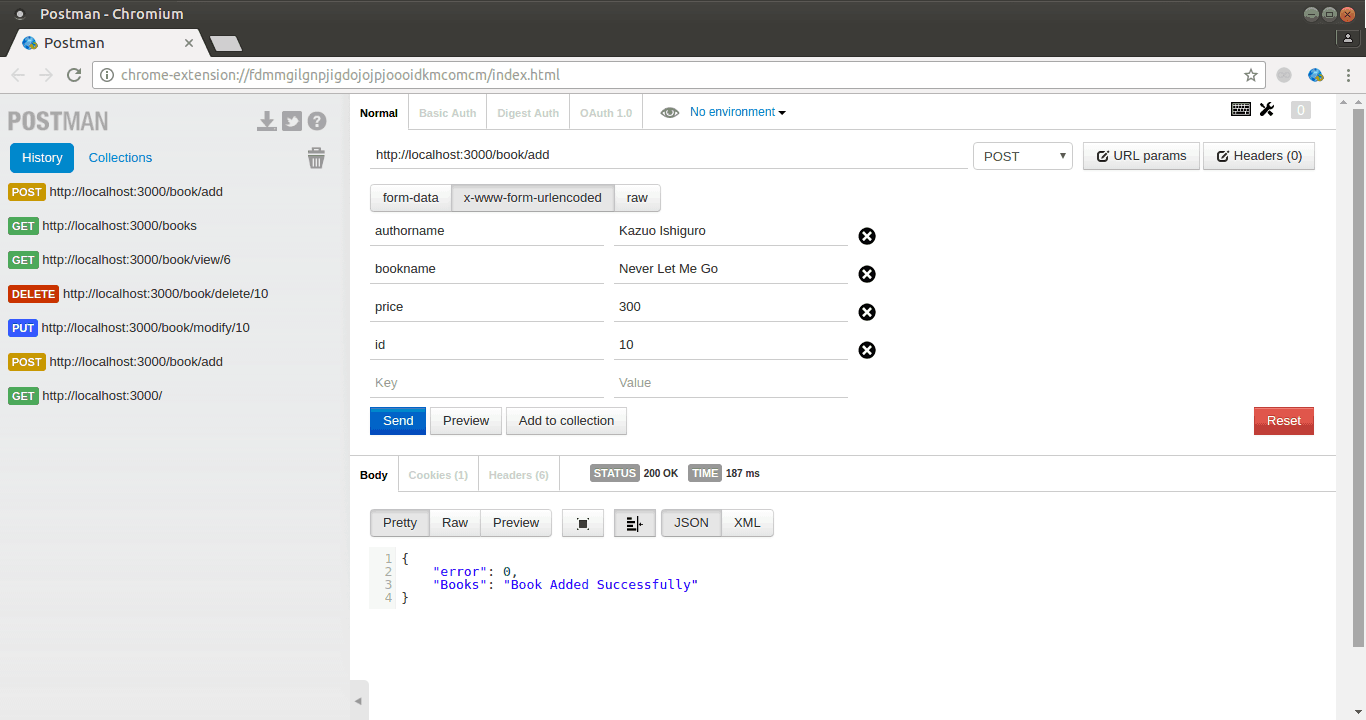
Adding a book to the catalog
Adding a book to the catalog can be done through HTTP POST method.
router.post(‘/book/add’,function())
[code language=”javascript”]
router.post(‘/book/add’,function(req,res){
var Id = req.body.id;
var Bookname = req.body.bookname;
var Authorname = req.body.authorname;
var Price = req.body.price;
var data = {
"error":1,
"Books":""
};
console.log(Id,Bookname,Authorname,Price);
console.log(!!Id && !!Bookname && !!Authorname && !!Price)
if(!!Id && !!Bookname && !!Authorname && !!Price){
var insert = "INSERT INTO books(id,authorname,bookname,price) VALUES (?,?,?,?);";
var params = [Id,Authorname,Bookname,Price];
console.log(params)
connection.execute(insert,params,function(err){
console.log(err);
if(!!err){
data["Books"] = "Error Adding data";
}else{
data["error"] = 0;
data["Books"] = "Book Added Successfully";
}
res.json(data);
});
}else{
data["Books"] = "Please provide all required data (i.e : id,Bookname, Authorname, Price)";
res.json(data);
}
});
[/code]
This is how the JSON output looks like for a successful operation.
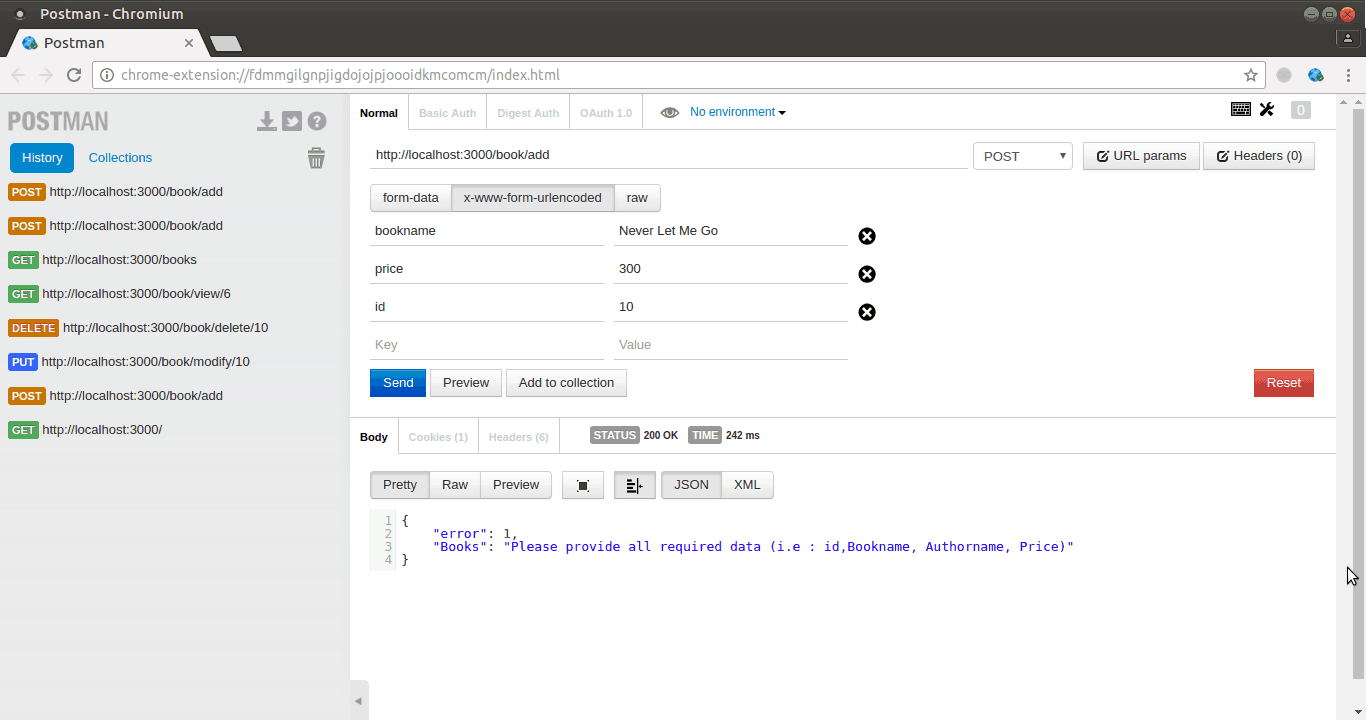
In the case of failure, due to incomplete information being provided for adding the book, the output looks like this.
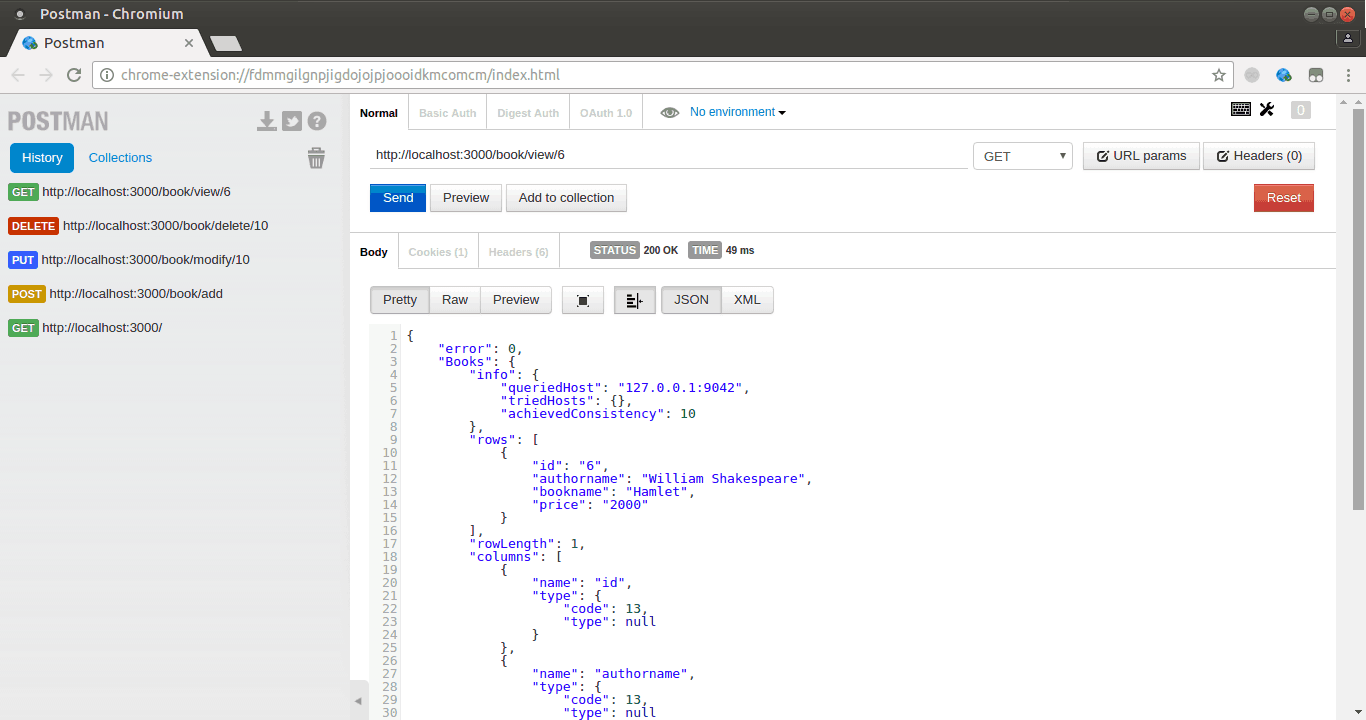
Viewing a book in the catalog
To view any particular book, we can use HTTP GET method. For this endpoint, we need to pass the id of the book.
Route URL for this will be defined as router.get(‘/book/view/’book id’’,function())
[code language=”javascript”]
router.get(‘/book/view/:id’,function(req,res){
var Id = req.params.id;
var data = {
"error":1,
"Books":"";
};
var params = [Id]
var select = "SELECT * from books WHERE id= ?;"
connection.execute(select,params,function(err, rows){
if(rows.length != 0){
data["error"] = 0;
data["Books"] = rows;
res.json(data);
}else{
data["Books"] = ‘No books Found..’;
res.json(data);
}
});
});
[/code]
Updating book details in the catalog
For updating the book information we can use HTTP PUT.
router.put(‘/book/modify/’book id’’,function())
Here also we have to use the id to identify the particular book whose details need to be updated.
[code language=”javascript”]
router.put(‘/book/modify/:id’,function(req,res){
var Id = req.params.id;
var Bookname = req.body.bookname;
var Authorname = req.body.authorname;
var Price = req.body.price;
var data = {
"error":1,
"Books":"";
};
if(!!Id && !!Bookname && !!Authorname && !!Price){
var update = "UPDATE books SET bookname=?, authorname=?, price=? WHERE id=?";
var params = [Bookname,Authorname,Price,Id]
connection.execute(update,params,function(err){
if(!!err){
data["Books"] = "Error Updating data";
}else{
data["error"] = 0;
data["Books"] = "Updated Book Successfully";
}
res.json(data);
});
}else{
data["Books"] = "Please provide all required data (i.e : id, Bookname, Authorname, Price)";
res.json(data);
}
});
[/code]
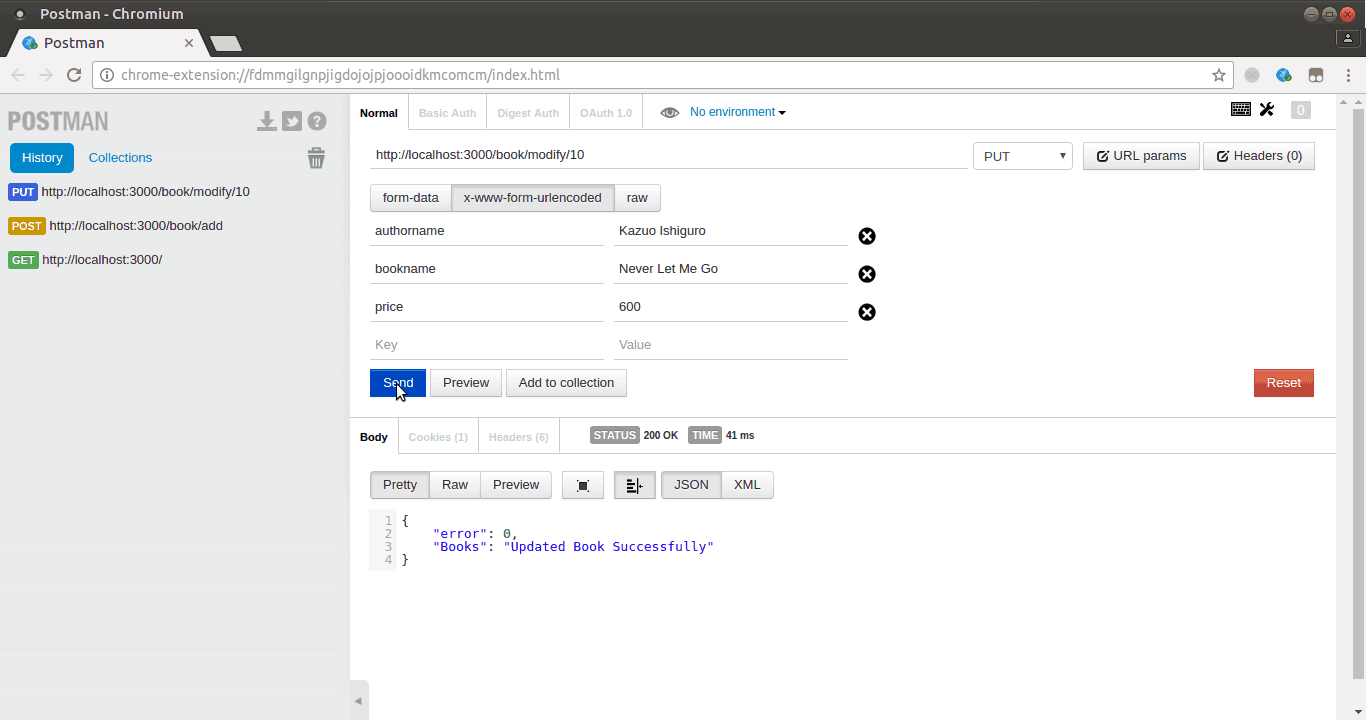
Just to ensure the sanity of this operation, it might be a good idea for you to verify the updated data in the database directly.
Deleting books from the catalog
Finally, to delete any book from the catalog, we will use the HTTP DELETE method. Its route URL will be defined as router.delete(‘/book/delete/’book id’’,function())
[code language=”javascript”]
router.delete(‘/book/delete/:id’,function(req,res){
var Id = req.params.id;
console.log(Id)
var data = {
"error":1,
"Books":""
};
if(!!Id){
var delet = "DELETE FROM books WHERE id=?";
var params = [Id]
connection.execute(delet,params,function(err){
if(!!err){
data["Books"] = "Error deleting data";
}else{
data["error"] = 0;
data["Books"] = "Delete Book Successfully";
}
res.json(data);
});
}else{
data["Books"] = "Please provide all required data (i.e : id )";
res.json(data);
}
});
[/code]

Here again, you should check directly in the database to verify the successful execution of this REST call.
Wrapping Up
Yes !! So we now have a working RESTful service implemented using Node/Express that offers anybody to connect to our book rental service programmatically. Of course, we have overlooked the big aspect, SECURITY. But that’s for another day.
Hope you enjoyed this post and I also hope that you did try the demo app instead of just reading through this post. In the next post, we’ll discuss HTTPS.
