

In this post, we cover the basics of enabling a Node/Express server application with HTTPS.
What’s the deal with HTTPS?
An HTTPS server adds an additional layer of security such that all messages exchanged between the client and server will be encrypted and hence cannot be interpreted by a sniffer. Since the Internet is built on top of TCP/IP which is essentially a shared network, there is always a risk of someone eavesdropping on your messages and trying to interpret it for wrongful gains.
Typically, HTTPS servers do a basic TLS/SSL handshake and accept any client connection as long as a compatible cipher suite can be found. However, the server can be configured to challenge the client with a CertificateRequest during the TLS handshake. This forces the client to present a valid certificate before the negotiation can continue.
What is SSL?
SSL Certificates are small data files that digitally bind a cryptographic key to an organization. When installed on a web server, it activates the padlock on the HTTP protocol and allows secure connections from a web server to a browser. There are many applications that need this kind of protection. Credit card transactions, confidential data transfer, and login authentication, and many such financial and authentication related applications are becoming the norm where security is of paramount importance.
SSL Certificates bind together:
- A domain name, server name or hostname
- An organizational identity (i.e. company name) and location
Creating SSL certificate
Let’s first walk through the process of creating certificates that we can use in our HTTPS enabled server. If SSL utilizes public key cryptography to encrypt the data stream traveling over the Internet, why is a certificate necessary? The technical answer to that question is that a certificate is not really necessary – the data is secure and cannot easily be decrypted by a third party. However, certificates do serve a crucial role in the communication process. The certificate, signed by a trusted Certificate Authority (CA), ensures that the certificate holder is really the one who he claims to be.
So firstly, we’ll build a Certificate Authority to sign our own client certificates. We can use a public CA which acts as a trusted source but that’s a paid service. We can create our own self-signed CA and certificates.
To be able to use SSL you need to generate
- Certificate Authority
- Server Certificate
Note:- The steps and the explanation given below for the SSL certificates are mostly derived from the various sources around the web. You can also refer to this tutorial from DigitalOcean which is quite exhaustive.
Step 1:
Make sure tha you have OpenSSL installed on your system,
sudo apt-get install openssl
Step 2:
Before we generate anything we need to generate a secure pass phrase.
pwgen 50 1 -s > passphrase
cat passphrase
“TNOojiJgDeqP1WwUYflXzBpbfZyl1vkAiuoXoikXRPQ9d1VBkC”
This is our secret pass phrase. Whenever we are asked for a passphrase, we can just copy & paste the unique passphrase that gets generated as shown above.
Step 3:
Let’s generate Certificate Authority first
1. Private Key
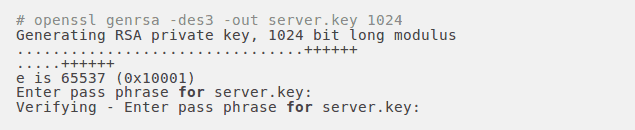
The OpenSSL toolkit is used to generate an RSA Private Key and CSR (Certificate Signing Request). It can also be used to generate self-signed certificates which can be used for testing purposes or internal usage.
The first step is to create our RSA Private Key. This key is a 1024 bit RSA key which is encrypted using Triple-DES.

2. Certificate Signing Request
Once the private key is generated, a Certificate Signing Request (CSR) can be generated. The CSR is then used in one of two ways. Ideally, the CSR will be sent to a Certificate Authority, such as Verisign who will verify the identity of the requestor and issue a signed certificate. The second option is to self-sign the CSR.
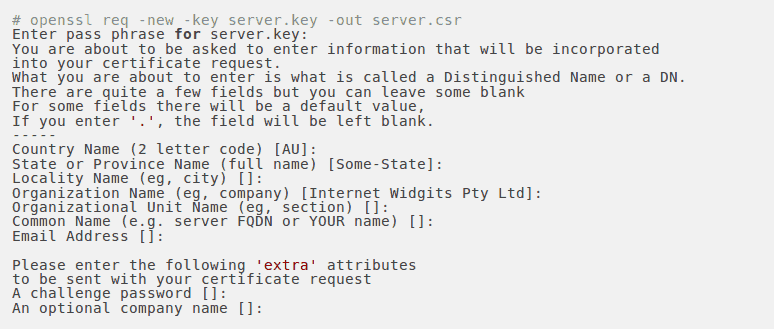
During the generation of the CSR, we will be prompted for several pieces of information. These are the X.509 attributes of the certificate. One of the prompts will be for “Common Name (e.g., YOUR name)”. It is important that this field is filled with the fully qualified domain name of the server to be protected by SSL. The command to generate the CSR is as follows:
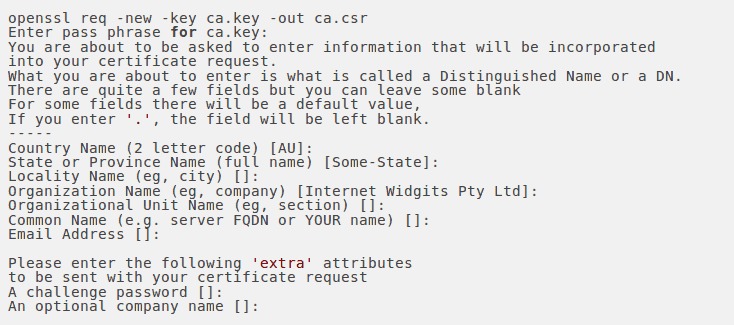
3. Signing the Certificate
Now we will self-sign our CA certificate. This certificate can be added along with the server certificate in the application. To generate a temporary certificate which is good for 365 days, issue the following command

Step 4:
Now let’s generate a server certificate. The process is more or less the same, except for some exceptions.
1. Private Key with passphrase
2. Certificate Signing Request
3. Private Key without passphrase
One unfortunate side-effect of the pass-phrased private key is that Apache will ask for the pass-phrase each time the web server is started. Obviously, this is not necessarily convenient as someone will not always be around to type in the pass-phrase, such as after a reboot or crash. It is possible to remove the Triple-DES encryption from the key, thereby no longer needing to type in a pass-phrase. If the private key is no longer encrypted, it is critical that this file only is readable by the root user! If our system is ever compromised and a third party obtains our unencrypted private key, the corresponding certificate will need to be revoked. With that being said, use the following command to remove the pass-phrase from the key:

4. Signing the certificate
At this point, we will need to generate a self-signed certificate. This temporary certificate will generate an error in the client browser to the effect that the signing certificate authority is unknown and not trusted.
To generate a temporary certificate which is good for 365 days, issue the following command:

Now we have finally generated our SSL certificates, Let’s use them in our demo Express application and make it HTTPS enabled.
HTTPS Demo Application
For the purpose of demonstration, we’ll create a simple Express application with HTTPS enabled routes. Source code for this demo code is available in this GitHub repo.
Following the above procedure for generating the certificates, we should accumulate the generated certificates in a sub directory under the Node project directory. For this demo, we have chosen to call it ‘keys’.
Now Create an app.js file which requires the SSL certificate key from the ‘keys’ sub directory and enables SSL for the app.
var secureServer = https.createServer({
    key: fs.readFileSync('./keys/server.key'),
    cert: fs.readFileSync('./keys/server.crt'),
    ca: fs.readFileSync('./keys/ca.crt'),
    requestCert: true,
    rejectUnauthorized: false
}, app).listen(HTTPS_PORT, function() {
    console.log("Secure Express server listening on port "+ HTTPS_PORT);
});
Run the application:
$ node app.js
When we run the app for the first time, the browser prompts for certificate authorization. Once authorized, you can see in the browser address bar that the app is HTTPS enabled.
I encourage you to build the earlier REST API demo with HTTPS enabled and see the difference. The difference lies in the ciphering of the HTTP packets and not in the UI of the application.
If you are familiar with Wireshark, you can see the HTTPS packets sent and received from your browser and also verify that the data is indeed ciphered. That is the way to ensure that any sensitive data is not visible to anyone.
Next Up
In the next blog post of this series, we’ll discuss how to run the Node application as a backend application server for a NGINX reverse proxy.
