
This is a tutorial from PubNub on how to build real-time, doctor-patient telemedicine chat app with React.
This post was originally published in PubNub.
Building real-time communication functionality for doctor-patient healthcare chat applications can be challenging. In addition to normal security precautions, in telemedicine app development you must also consider HIPAA regulations, as well as requirements in the healthcare industry that medical professionals must adhere to. In this tutorial, we’ll cover how to build a HIPAA compliant telemedicine chat app that can be used by healthcare professionals and their patients to safely share medical data.
Sending a message with electronic protected health information (ePHI) in any form is regulated under HIPAA, with good reason. Who would want their messaging provider—or another third party—knowing their private medical data or accessing their records? When considering healthcare app development, you should take every precaution to secure ePHI. You are responsible for following the safeguards set by HIPAA. However, many of the resources provided by the government are perpetually outdated. How do you know if you are following the rules in your healthcare web app?
The best way to ensure HIPAA compliance is to use a HIPAA compliant service, like PubNub, to transmit and store ePHI instead of doing the work yourself. Using an existing, secured service lets you find time to focus on innovating your application, without worrying about building the HIPAA complaint infrastructure and scaling it. PubNub provides scalable, secure, and reliable infrastructure that’s HIPAA compliant. Safely use PubNub to stream or store sensitive health information from a healthcare app.
PubNub will sign a Business Associate Agreement for healthcare providers and healthcare applications in our Pro Pricing tier. PubNub has been HIPAA compliant since 2015. The healthcare industry and PubNub were practically made for each other.
What Do I Need to Build a Doctor-Patient Messaging App?
PubNub React chat kits offer HIPAA compliant solutions for the unique needs of telemedicine applications—saving lots of software development time. This is great for telehealth app development startup projects. Our Healthcare Doctor-Patient Chat App was created from our Live Support Chat Kit. The Healthcare Doctor-Patient Chat App reuses the support agent dashboard as a doctor dashboard, and the client chat widget as a patient chat widget. Since the kit is modular, it’s possible to enable and disable components and customize the CSS to meet your telemedicine solution’s specific needs.
This tutorial will walk you through the steps to build a patient chat widget and a doctor messaging dashboard, using components in React. These components allow you to quickly and easily customize the telemedicine experience to your healthcare needs, with a lot of flexibility.
The components for our Healthcare Doctor-Patient Chat App are built to be reusable and flexible for portability into another React application. Customize the open source chat components by editing their CSS and layout to your needs. This tutorial is a template for building an elegant healthcare live-chat solution. Use this as a starting point for your healthcare professional application.

How does PubNub Enable Real-time Telemedicine Apps?
In this tutorial, PubNub is used for presence indicators, reliable messaging delivery, and other chat-related data, which enable the front end React components to update live as messages are received and patients come online. This telehealth app is HIPAA compliant without any additional changes.
Some key reasons medical professionals use PubNub include:
- Patient Presence is built-in. Easily create online and offline indicators for managing multiple consultations.
- PubNub delivers billions of messages every day, so your healthcare app will work at any scale. You can trust that health records are transmitted.
- Storage and Playback is available for message history, which means healthcare professionals can jump right into a consultation for the best medical care.
- Push Notifications support is included. This can power alerts for new replies on a patient’s mobile device—like when a doctor sends a message after the patient has closed out of your healthcare app.
You don’t need experience with PubNub or PubNub SDKs to use these React chat components. The telemedicine chat components explained in this tutorial are already fully integrated with PubNub.
React Development Environment Set Up
First, we’ll configure the tools needed to build a real-time telemedicine chat application in React. Here’s how:
How to set up your Node.js development environment
To start building with PubNub and our telemedicine React components, you first need to install Node.js.
If you’ve already installed Node.js, go to the next section.
If you don’t have Node.js installed, visit the Node.js Downloads page and select the installer for your platform.
Open your terminal and run the following commands to check the installation:
node -v
npm -v
You should see a version number after you run these commands.
How to set up your Git to clone the open source healthcare app
To clone the React project for this tutorial from GitHub, you need Git installed.
If you’ve already installed Git, go to the next section.
To install Git, follow the Getting Started – Installing Git guide.
Open your terminal and run the following command to check Git installation:
git --versionYou should see a version number after you run the command.
Setting up PubNub for telemedicine app components
Before we begin building our healthcare functionality, let’s set up the backend that we’ll use with our healthcare chat components. Once you complete these steps, you will have two API keys that you’ll use in this tutorial. The API keys and your PubNub account are free. To set up your healthcare messaging backend:
- Sign up for a PubNub account.
- Go to your PubNub Dashboard.
- Click Create New App.
- Give your app a name, and select Chat App as the app type.
- Click Create.
- Click your new app to open its settings, then click its keyset.
- Enable the Channel Presence feature for your keyset.
- Enable the Storage and Playb ack feature for your keyset.
- Enable the Stream Controller feature for your keyset.
- Save the changes.
- Copy the Publish and Subscribe keys for the next steps.
Building and running a telemedicine chat app with React
Now that you have your PubNub API keys, start building your doctor-patient chat with React components.
To start this process, open your terminal, clone the Live Support Chat Kit repository below, and switch to the healthcare branch. This repo contains the PubNub powered, open-source chat components and chat UI necessary to build a telemedicine chat solution.
git clone https://github.com/PubNubDevelopers/chat-component-app-live-support.git
git branch healthcare-chat-app
There are two projects in the repo: the Doctor Dashboard and the Patient Chat Widget. The Doctor Dashboard gives healthcare professionals a place to see patients that are online and chat with them. The Patient Chat Widget offers an easy way for patients to interact with doctors.
Building and running a doctor telemedicine app dashboard
To create your Doctor Dashboard, navigate into the repository with your terminal. The Doctor Dashboard can be tested and run from this location.
cd /chat-component-app-live-support/doctor-dashboardNext, configure the components with the API keys obtained from your PubNub dashboard. Your API keys allow you to send and receive messages on the PubNub network.
Open the file src/config/pubnub-keys.json and replace YOUR_PUBLISH_KEY_HERE and YOUR_SUBSCRIBE_KEY_HERE with your API keys.
The Node module dependencies used by the healthcare chat components need to be installed. It may take a few minutes to download and install the dependencies with npm.
npm installNow run the doctor dashboard.
npm startThe Doctor Dashboard should now open at http://localhost:8080, but to test it out you’ll need to start a Patient Chat Widget.
Building and running a Patient Chat Widget
To create your Patient Chat Widget, navigate into the repository with your terminal. The Patient Chat Widget can be tested and run from this location.
cd /chat-component-app-live-support/patient-widgetNext, configure the components with the API keys obtained from your PubNub dashboard. Your API keys allow you to send and receive messages on the PubNub network.
Open the file src/config/pubnub-keys.json and replace YOUR_PUBLISH_KEY_HERE and YOUR_SUBSCRIBE_KEY_HERE with your API keys. Make sure to use the same API keys you used for the Doctor Dashboard.
Next, the Node module dependencies used by the Patient Chat Widget components need to be installed. It may take a few minutes to download and install the dependencies with npm.
npm installNow run the project and try out each of the components.
npm startThe Patient Chat Widget should now open at http://localhost:8081.
Testing telemedicine app real-time doctor-patient chat
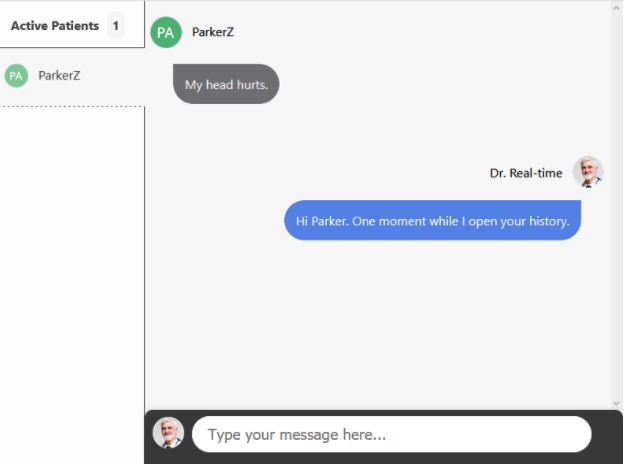
When the Patient Chat Widget React app opened, you should have immediately seen a new active patient in the Doctor Dashboard. If you refresh the Patient Chat Widget or open it in more windows, you’ll see more users show up in the active patients list on the Doctor Dashboard. Based on the settings you’ve configured in your PubNub dashboard, these patients will disappear after you close the Patient Chat Widget windows.
Try selecting a patient name in the active patients list to open a chat in the Doctor Dashboard. Put text in the text area and press enter. You should see your message appear in the message list area in both the Doctor Dashboard and the Patient Chat Widget. Respond from the Patient Chat Widget, and see the messages in the Doctor Dashboard.
Telemedicine App Component Structure
Now that you’ve tried out the Doctor-Patient Chat components, let’s review the component structure of each UI view. The Doctor Dashboard and the Patient Chat Widget have slightly different component structures. However, the components in both applications work together to create a complete telehealth chat experience. The components also allow you to easily customize or expand on them for more healthcare functionality.
Doctor Dashboard structure
- Active Users: This component displays a list of the active patients that have Patient Chat Widgets open. This uses PubNub Presence events to maintain the list of chats.
- Message List: This component displays the messages received in the chat, and any chat history when a new patient is selected.
- Compose: This component provides a text input area for composing new messages to send to the chat. The corresponding Patient Chat Widget will receive the message.
Patient Chat Widget structure
- Message List: This component displays the messages received from the doctor.
- Compose: This component provides a text input area for composing new messages to send to the chat. The Doctor Dashboard will receive the message.
Doctor-patient Telemedicine Chat Components Explained
Let’s further break down how the healthcare chat components work and how customize them.
Component alignment
Some components are primarily used to align the functional chat components. These components are:
- ChatDemo: In both UI views, this is used to outline the application. If you open the file src/components/ChatDemo/ChatDemo.tsx in either UI view, you’ll find the component structure. Notice how, in the Doctor Dashboard, there are two main sides to this chat application. In the Patient Chat Widget there is only one.
Doctor Dashboard:
<ChatDemoWrapper>
      <ActiveUsersListPanelWrapper>
        <ActiveUsersListPanel />
      </ActiveUsersListPanelWrapper>
      <MessageListPanelWrapper>
        <MessageListPanel />
      </MessageListPanelWrapper>
    </ChatDemoWrapper>
Patient Chat Widget:
<ChatDemoWrapper>
      <MessageListPanelWrapper>
        <MessageListPanel />
      </MessageListPanelWrapper>
    </ChatDemoWrapper>
MessageListPanel: For both UI views, this component provides the alignment for the MessageList component and the Compose text area. Open the file for either UI view at src/components/MessageListPanel/MessageListPanel.tsx and you’ll find the component structure (it’s the same for both).
<MessageList />
      <ComposeMessageBoxWrapper>
        <UserImgWrapper src={state.selfAvatar} />
        <TextInputWrapper>
          <SendMessageField />
        </TextInputWrapper>
      </ComposeMessageBoxWrapper>
The MessageListPanel component has an area to display the current patient avatar. The avatar url is created in src/AppStateContext.tsx file when the initial state is defined. It’s set from the name created by the generatedName() function for the Patient Chat Widget. The Doctor Dashboard always uses the name “Dr. Real-time” and the avatar always stays the same. Consider the avatar URL a placeholder for where you set custom avatars or use a service like Gravatar.
selfAvatar: "https://ui-avatars.com/api/?name="+generatedName+"?size=100&rounded=true&uppercase=true&bold=true&background=edab63&color=FFF", //The img for the avatar graphic file
  selfName: generatedName, // Set the display name.
ActiveUsersListPanel: For the Doctor Dashboard only, this component aligns the ActiveUsersList component.
Compose component
Both Compose components can be found in the src/components/ComposeMessageBox directory for either view. Open the file ComposeMessageBox.tsx, and you’ll see the Compose component returns a text area.
<SendMessageField></SendMessageField>A function for handling key press events dispatches the SEND_MESSAGE function declared in the src/AppStateContext.tsx file for both views.
const handleKeyDown = (event) => {
    if (event.key === 'Enter') {
      dispatch({
        type: 'SEND_MESSAGE',
        payload: textAreaEl.current.value,
      })
      textAreaEl.current.value = ''
    }
  }
The SEND_MESSAGE function publishes the contents of the input field to the active channel. This is publishing a chat message in real-time. In this app, the Patient Chat Widget publishes messages to a channel name based on the user’s generated name. The active channel for the Doctor Dashboard is determined by the last user selected in the active users panel (it must be selected first). The sender’s name is also appended to the published message.
Doctor Dashboard:
// Publishes a message to chat channel.
    case "SEND_MESSAGE": {
 if (state.activeChannel == "") {
        alert("Select a patient from the list first to send messages.");
      } else {
        state.pubnub.publish({
          channel: state.activeChannel,
          message: {
            "message": DOMPurify.sanitize(action.payload as string) as string,
            "senderName": state.selfName as string,
          },
        });
      }
      return { ...state }
    }
Patient Chat Widget:
// Publishes a message to the chat channel.
    case "SEND_MESSAGE": {
      state.pubnub.publish({
        channel: state.activeChannel,
        message: {
          "message": DOMPurify.sanitize(action.payload as string) as string,
          "senderName": state.selfName as string,
        },
      });
      return { ...state }
User Presence Component
The Doctor Dashboard has an Active Users component that’s found in the src/components/ActiveUsersList directory. Open the file ActiveUsersList.tsx. You’ll see that the component returns a list from the UUIDs in the state.activeUsers array. The Active Users component also shows a count of the current occupancy in the header of the list. The UUID for a patient is configured to the same as the generated name for each patient. As a result, you don’t need any additional information to visually display who a patient is (so there’s no API lookup).
const ActiveUsers = Array.from(state.activeUsers).map((activeUserName: string, i: number) => {
    return (
      <React.Fragment key={i}>
        <ActiveUser activeUser={activeUserName} />
        <div ref={activeUserEndRef} />
      </React.Fragment>
    );
  });
  return <><ActiveUsersHeader>Active Users<ActiveUsersOccupancy>{state.presenceOccupancy}</ActiveUsersOccupancy></ActiveUsersHeader><ActiveUsersListWrapper>{ActiveUsers}</ActiveUsersListWrapper></>
The ActiveUser sub component is found in the src/components/ActiveUser directory. Open the file ActiveUser.tsx. If the patient being listed is selected by the doctor, the name will be highlighted in the list. Each patient name is displayed with an avatar generated from the user’s name.
const ActiveAvatarURL = "https://ui-avatars.com/api/?name="+props.activeUser+"?size=100&rounded=true&uppercase=true&bold=true&background=5EB977&color=FFF";

    const handleChannelChange = (event) => {
        dispatch({
            type: 'CHANGE_CHANNEL',
            payload: props.activeUser,
        })
    }
    if ("doctor."+props.activeUser == state.activeChannel) {
        return (
            <ActiveUserWrapperSelected onClick={handleChannelChange}>
                <ActiveUserAvatarWrapper src={ActiveAvatarURL} />
                <ActiveUserNameWrapper>{props.activeUser}</ActiveUserNameWrapper>
            </ActiveUserWrapperSelected>
        )
    }
    return (
        <ActiveUserWrapper onClick={handleChannelChange}>
            <ActiveUserAvatarWrapper src={ActiveAvatarURL} />
            <ActiveUserNameWrapper>{props.activeUser}</ActiveUserNameWrapper>
        </ActiveUserWrapper>
    )
When a patient is selected in the list the “CHANGE_CHANNEL” function is dispatched. The “CHANGE_CHANNEL” function updates the state.messages array in src/AppStateContext.tsx with the history of messages for that patient. This way, if a patient is messaging before the doctor has the chat open, they can still see the messages. If there are no messages, then an alert message shows to let the doctor know to start the consultation.
//Change activeChannel and get history for the new channel.
    case "CHANGE_CHANNEL": {
      if (state.activeChannel != "doctor."+action.payload) {
        var historyMessages: Array<string> = [];
        state.pubnub.history(
          {
              channel: state.channel+"."+action.payload,
              count: state.historyMax // Limit of 100 messages.
          },
          (status, response) => {
            if (typeof response.messages !== "undefined" && response.messages.length > 0) {
              for (var i = 0; i <= response.messages.length; i++) {
                if (typeof response.messages[i] !== "undefined") {
                  historyMessages.push(response.messages[i].entry);
                }
              }
            } else {
              historyMessages.push({
                message: "Send a message to "+action.payload+" to start the consultation.",
                senderName: "Doctor Dashboard Alert",
                userAvatar: "https://ui-avatars.com/api/?name=?size=100&rounded=true&uppercase=true&bold=true&background=FB0106&color=FB0106"
              });
            }
          }
        );
        const changeChannelState: AppState = {
          ...state,
          messages: historyMessages,
          activeChannel: state.channel+"."+action.payload
        };
        return changeChannelState;
      }
      return { ...state }
    }
The src/AppStateContext.tsx file manages the state.activeUsers array. When the application is started, a hereNow call is made to PubNub for the global channel occupants. The doctor is not added to the list, since the doctor does not need to chat with themselves.
state.pubnub.hereNow(
          {
              channels: [state.channel],
              includeUUIDs: true // In this demo we're using the uuid as the user's name. You could also use presence state to provide a username and more. In this app all we need is the UUID of online users.
          },
          (status, response) => {
            if (response.channels[state.channel].occupancy > 0) {
              for (var i = 0; i < response.channels[state.channel].occupancy; i++) {
                if ((!state.activeUsers.includes(response.channels[state.channel].occupants[i].uuid)) && (response.channels[state.channel].occupants[i].uuid !== state.selfName)) {
                  newActiveUsers.push(response.channels[state.channel].occupants[i].uuid);
                }
              }
              newActiveUsers.sort();
              dispatch({
                type: "REFRESH_ACTIVEUSERS",
                payload: newActiveUsers
              });
              dispatch({
                type: "UPDATE_OCCUPANCY",
                payload: newActiveUsers.length
              });
            }
          }
        );
The “REFRESH_ACTIVEUSERS” function refreshes the state.activeUsers array with the new list of users. The “UPDATE_OCCUPANCY” function updates the count of state.presenceOccupancy.
//REFRESH_ACTIVEUSERS replaces array of users in our internal activeUsers buffer.
    case "REFRESH_ACTIVEUSERS": {
       const activeUsersList: AppState = {
        ...state,
        activeUsers: [
          ...action.payload as Array<string>
        ]
      };
      return activeUsersList;
    }
    //UPDATE_OCCUPANCY updates the current count of users
    case "UPDATE_OCCUPANCY": {
      const occupantsUpdate: AppState = {
        ...state,
        presenceOccupancy: action.payload as string
      };
      return occupantsUpdate;
    }
When patients open and close the Patient Chat Widget, the list of active patients is updated by a PubNub listener callback (the same one used for new messages) in the Doctor Dashboard.
presence: function(p) {
          if (p.action == "join") {
            if ((!state.activeUsers.includes(p.uuid)) ) { // Only add users if they are missing from the list.
              newActiveUsers.push(p.uuid);
              newActiveUsers.sort();
              dispatch({
                type: "REFRESH_ACTIVEUSERS",
                payload: newActiveUsers
              });
              dispatch({
                type: "UPDATE_OCCUPANCY",
                payload: newActiveUsers.length
              });
              // Add to current count
            }
          }
          if ((p.action == "timeout") || (p.action == "leave")) {
            var index = newActiveUsers.indexOf(p.uuid)
            if (index !== -1) {
              newActiveUsers.splice(index, 1);
              dispatch({
                type: "REFRESH_ACTIVEUSERS",
                payload: newActiveUsers
              });
              dispatch({
                type: "UPDATE_OCCUPANCY",
                payload: newActiveUsers.length
              });
            }
          }
        }
Message List component
The Message List component is located in the src/components/MessageList directory for both chat UI views. Open the file MessageList.tsx. You’ll see that the Message List component returns the list of messages from the state.messages array. This component is the same for both UI views.
export const MessageList: React.SFC<MessageListProps> = (props: MessageListProps) => {
  const { state } = useAppState();
  const [stopOnScroll, setStopOnScroll] = useState(false);
  const messagesEndRef = useRef<null | HTMLDivElement>(null)
  const scrollToBottom = () => {
   messagesEndRef?.current?.scrollIntoView({ block: "end", inline: "nearest", behavior: "smooth" });
    }
  useScrollPosition(({ prevPos, currPos }) => {
     const isShow = currPos.y > prevPos.y
    if (isShow !== stopOnScroll) setStopOnScroll(isShow)
  }, [])
  useEffect(scrollToBottom, [state.messages])
  const Messages = Array.from(state.messages).map((onemessage: Array<any>, i: number) => {
    return (
      <React.Fragment key={i}>
        <Message message={onemessage} />
        <div ref={messagesEndRef} />
      </React.Fragment>
    );
  });
  return <MessageListWrapper>{Messages}</MessageListWrapper>
The Message subcomponent is located in the src/components/Message directory for both chat UI views. Open the file Message.tsx. Note that messages are conditionally formatted, depending on if you sent or received the message. Each message is formatted with an avatar (generated from the message sender name), the sender name, and the actual message. The message subcomponent for the Doctor Dashboard is slightly different. It enables alerts to help the doctor use the dashboard.
Doctor Dashboard:
if (props.message.senderName == state.selfName) { // Display messages from yourself on the right.
      const userAvatar = "https://uc.uxpin.com/files/879252/879907/asian_young_main_group_hospital_professional-c0ba747cc87f47e9e774a98d96ab200e.png";
      return (
            <MessageWrapper key={props.message.internalKey}>
                <RightWrapper>
                    <SenderNameWrapperSelf>{props.message.senderName}</SenderNameWrapperSelf>
                    <AvatarWrapperSelf src={userAvatar} />
                </RightWrapper>
                 <MessageMessageWrapperSelf><MessageMessageInnerWrapperSelf>{props.message.message}</MessageMessageInnerWrapperSelf></MessageMessageWrapperSelf>
            </MessageWrapper>
        )
    } else {
        let userAvatar = "https://ui-avatars.com/api/?name="+props.message.senderName+"?size=100&rounded=true&uppercase=true&bold=true&background=5EB977&color=FFF";
        if (props.message.senderName == "Doctor Dashboard Alert"){ // Use red for alerts
            userAvatar = "https://ui-avatars.com/api/?name=%21+%21?size=100&rounded=true&uppercase=true&bold=true&background=FF6B56&color=FF6B56";
        }
        return (
            <MessageWrapper key={props.message.internalKey}>
                <AvatarWrapper src={userAvatar} />
                <SenderNameWrapper>{props.message.senderName}</SenderNameWrapper>
                <MessageMessageWrapper><MessageMessageInnerWrapper>{props.message.message}</MessageMessageInnerWrapper></MessageMessageWrapper>
            </MessageWrapper>
        )
    }
Patient Chat Widget:
if (props.message.senderName == state.selfName) { // Display messages from yourself on the right.
      const userAvatar = "https://ui-avatars.com/api/?name="+props.message.senderName+"?size=100&rounded=true&uppercase=true&bold=true&background=edab63&color=FFF"
      return (
            <MessageWrapper key={props.message.internalKey}>
                <RightWrapper>
                    <SenderNameWrapperSelf>{props.message.senderName}</SenderNameWrapperSelf>
                    <AvatarWrapperSelf src={userAvatar} />
                </RightWrapper>
                 <MessageMessageWrapperSelf><MessageMessageInnerWrapperSelf>{props.message.message}</MessageMessageInnerWrapperSelf></MessageMessageWrapperSelf>
            </MessageWrapper>
        )
    } else {
        const userAvatar = "https://uc.uxpin.com/files/879252/879907/asian_young_main_group_hospital_professional-c0ba747cc87f47e9e774a98d96ab200e.png"
        return (
            <MessageWrapper key={props.message.internalKey}>
                <AvatarWrapper src={userAvatar} />
                <SenderNameWrapper>{props.message.senderName}</SenderNameWrapper>
                <MessageMessageWrapper><MessageMessageInnerWrapper>{props.message.message}</MessageMessageInnerWrapper></MessageMessageWrapper>
            </MessageWrapper>
        )
    }
}
The state.messages array is managed by the src/AppStateContext.tsx file for both chat UI views. When the application starts, a subscription for messages begins. In the Patient Chat Widget, the subscription is for the global telehealth channel (“doctor”) and an active channel set to “doctor.[generated name]”. In the Doctor Dashboard the subscription is for the global telehealth channel (“doctor”) and the global channel + wildcard (“doctor.*”). The subscription for the global telehealth channel “doctor” is only used for application-wide presence. It is not used for sending and receiving messages.
Doctor Dashboard:
// Subscribe on the default channel.
      state.pubnub.subscribe(
        {
          channels: [state.channel, state.channel+".*"], // Subscribe to global channel for presence events and to the wildcard for chat messages.
          withPresence: state.presence,
        }
      );
Patient Chat Widget:
 // Subscribe on the default channel.
      state.pubnub.subscribe(
        {
          channels: [state.channel, state.activeChannel], // Subscribe to both the global and active channel.
          withPresence: state.presence,
        }
      );
New messages from the subscription are received by the PubNub listener callback. The Doctor Dashboard also filters messages and only displays messages received from the currently active chat/channel.
Doctor Dashboard:
state.pubnub.addListener({
        message: (messageEvent) => {
          messageEvent.message.message = DOMPurify.sanitize(messageEvent.message.message as string) as string;
          if (messageEvent.channel == state.activeChannel) { // Only add messages sent to activeChannel
            dispatch({
              type: "ADD_MESSAGE",
              payload: messageEvent.message
            });
          }
        },
      });
Patient Chat Widget:
state.pubnub.addListener({
        message: (messageEvent) => {
          messageEvent.message.message = DOMPurify.sanitize(messageEvent.message.message as string) as string;
          dispatch({
            type: "ADD_MESSAGE",
            payload: messageEvent.message
          });
        },
});
Messages are added to the message list array with the ADD_MESSAGE function. The ADD_MESSAGE function adds the new message to the start of the array and discards old messages.
//ADD_MESSAGE adds an incoming message to our internal MessageList buffer.
    case "ADD_MESSAGE": {
      //If the message list is over our cap we discard the oldest message in the list.
      if (state.messages.length > state.maxMessagesInList ){
        state.messages.shift();
      }
      const addMessage: AppState = {
        ...state,
        messages: [
          ...state.messages as Array<string>,
          {
            ...action.payload as Array<string>
          }
        ]
      };
      return addMessage;
    }
Adding More Features to a Doctor-patient Telehealth App
The components demoed here are all customizable with more features. You can use them to build other projects, such as a healthcare chatbot. Think of these healthcare components as a template, and expand from there.
Some other chat features to include with PubNub:
- Unread Message Count
- Send images and files
- User Authentication
Learn more about building a healthcare application with these resources:
- Want to learn more about the pandemic and telemedicine? What COVID-19 Teaches Us About Telemedicine
- Transmitting ePHI? HIPAA Technical Safeguards: How To Protect Sensitive Data
- Building HIPAA chat? Our HIPAA Compliance Checklist
