
Click to call lets your website users engage with your support and sales teams on your website. Sometimes users might want to speak to someone via their handset but initiate the call online, or they might want to talk to someone directly from the website. You can implement either use case using Plivo’s Browser SDK.
This post was originally published in Plivo.
To get started, you need a Plivo account — sign up with your work email address if you don’t have one already. You must have a voice-enabled Plivo phone number to receive incoming calls; you can rent numbers from the Numbers page of the Plivo console, or by using the Numbers API. Click to call requires JavaScript; we recommend using Node.js. If this is your first time triggering a PHLO with Node.js, follow our instructions to set up a Node.js development environment and a web server and safely expose that server to the internet.
Build the PHLO
To create a PHLO, visit the PHLO page of the Plivo console. If this is your first PHLO, the PHLO page will be empty.
- Click Create New PHLO.
- In the Choose your use case pop-up, click Build my own. The PHLO canvas will appear with the Start node. The Start node is the starting point of any PHLO. It lets you trigger a PHLO to start upon one of three actions: incoming SMS message, incoming call, or API request.
- Click the Start node to open the Configuration tab, and then enter the information to retrieve from the HTTP Request payload — in this case key names are destinationNumber and phoneMeNumber. The values will remain blank as we will receive them when the request is made by the browser.
- Validate the configuration by clicking Validate. Do the same for each node as you go along.
- From the list of components on the left side, drag and drop the Initiate Call component onto the canvas. This adds an Initiate Call node onto the canvas. When a component is placed on the canvas it becomes a node.
- Draw a line to connect the Start node’s API Request trigger state to the Initiate Call node.
- In the Configuration tab of the Initiate Call node, give the node a name. To enter values for the From and To fields, enter two curly brackets to view all available variables, and choose the appropriate ones. The values for the numbers will be retrieved from the HTTP Request payload you defined in the Start node. Here From is 14159142884 and To is
{{Start.http.params.phoneMeNumber}}. - From the list of components on the left side, drag and drop the Call Forward component onto the canvas. Draw a line to connect the Answered trigger state of the Initiate Call node with the Call Forward node.
- Configure the Call Forward node to initiate call forward to another user. To enter values for the From and To fields, enter two curly brackets to view all available variables, and choose the appropriate ones. The values for the numbers will be retrieved from the HTTP Request payload you defined in the Start node. Here From is
{{Start.http.params.phoneMeNumber}}and To is{{Start.http.params.destinationNumber}}. - After you complete and validate the node configurations, give the PHLO a name by clicking in the upper left, then click Save.
- From the list of components on the left side, drag and drop the Call Forward component onto the canvas.
- Draw a line to connect the Start node’s Incoming call trigger state to the Call Forward node.
- In the Configuration tab of the Call Forward node, give the node a name. To enter values for the From and To fields, enter two curly brackets to view all available variables, and choose the appropriate ones. The values for the numbers will be retrieved from the HTTP Request payload you defined in the Start node. Here From is
{{Start.http.params.header1}}. and To is{{Start.http.params.to}}. - After you complete and validate the node configurations, give the PHLO a name by clicking in the upper left, then click Save.
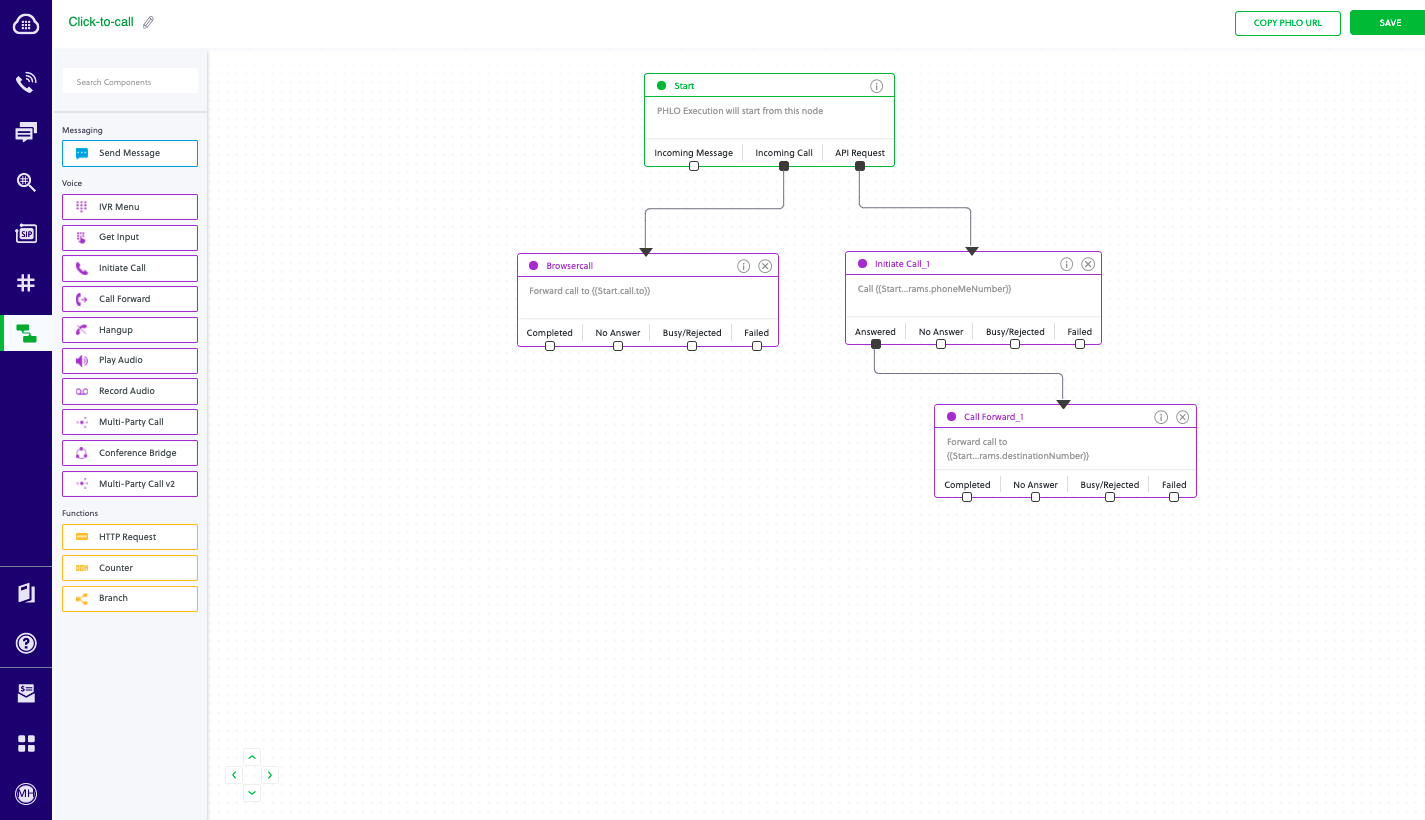
Your complete PHLO should look like this:
Copy Our Demo Application
You need a little code to trigger the PHLO, but we’ve written it for you. Clone the repository from GitHub.
$ git clone https://github.com/plivo/click2call-webRTC.gitChange your working directory to click2call-webRTC.
$ cd click2call-webRTCInstall dependencies using the npm package manager, which uses the package.json file to specify the packages a project depends on.
$ npm installEdit the .env file.
PORT="8080";
PLIVO_AUTH_ID="<auth_id>";
PLIVO_AUTH_TOKEN="<auth_token>";
PHLO_ID="<phlo_url>";
Replace the auth placeholders with your authentication credentials from the Plivo console. Enter your PHLO ID, which you can also find on the Plivo console.
Edit /client/src/index.jsx and replace the <caller_id> placeholder with a Plivo number.
What the Code Does
Turn to our documentation for a full walkthrough of the code. It explains what happens when someone clicks on an application button to initiate a call, along with code snippets.
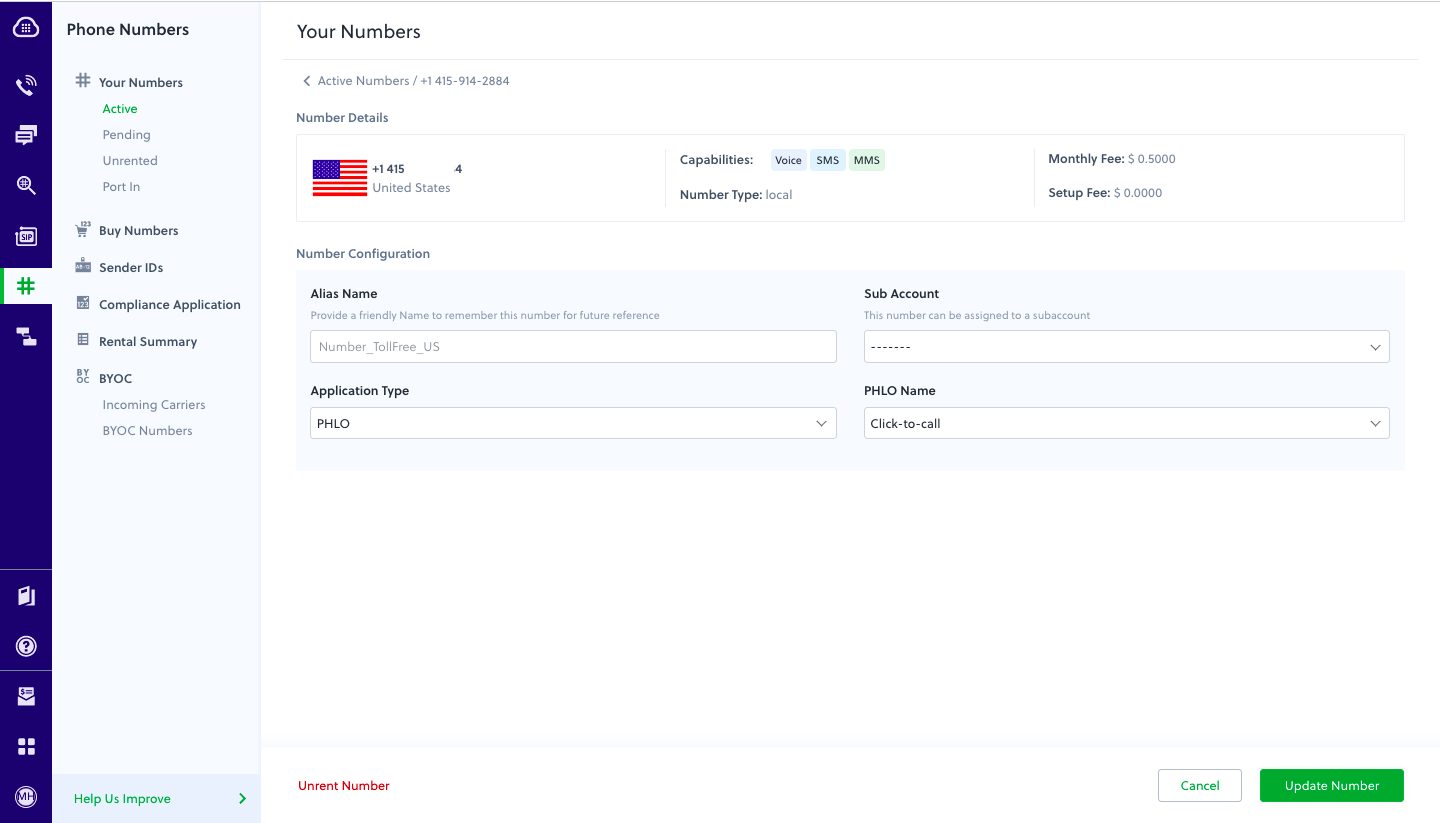
To trigger the PHLO, you must assign it to a Plivo phone number. To do that, visit the Numbers page of the console, and under Your Numbers click the phone number you want to use for the PHLO.
In the Number Configuration box, select PHLO from the Application Type drop-down.
From the PHLO Name drop-down, select the PHLO you want to use with the phone number, then click Update Number.
Try It Out
To see the PHLO in action, run npm run watch and npm run start. You can then go to http://localhost:8080/ to see the application. To make it available to the internet, set up ngrok.
Before you try it out, be aware that if you’re using a Plivo Trial account, you can make calls only to phone numbers that have been verified with Plivo. You can verify (sandbox) a number by going to the console’s Phone Numbers Sandbox Numbers page.
