
Computer vision offers an agile solution for managing a smart parking system within limited area of coverage. This use case shows you how to build a prototype using low-code/no-code platform.
This post was originally published in Viso.ai.
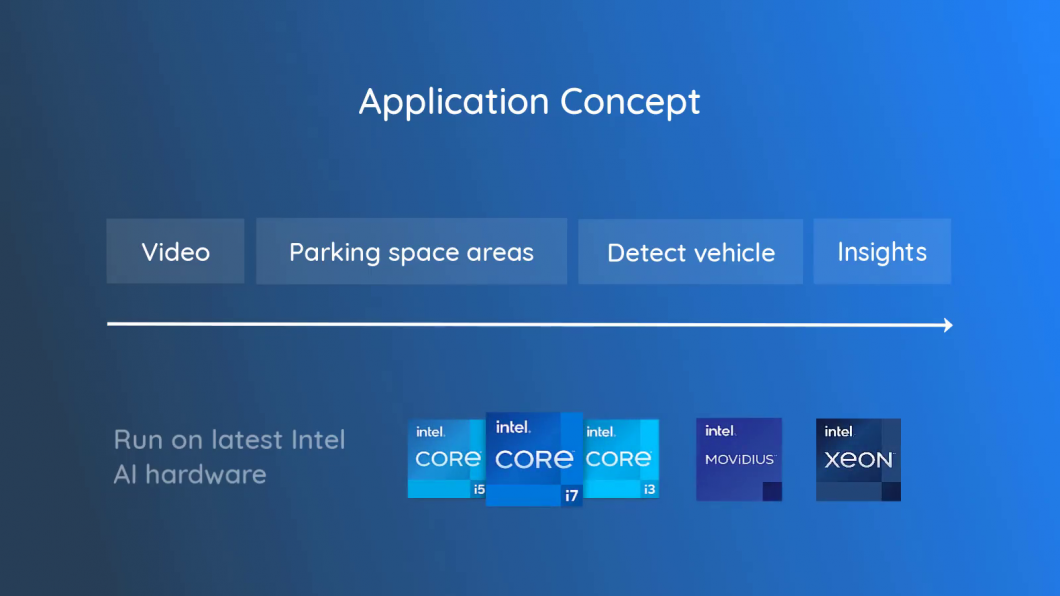
This guide will show how to build a parking lot occupancy detection system with the end-to-end computer vision platform Viso Suite. The Viso platform lets you run the real-time image recognition application on the latest, most powerful AI hardware.
For an optimal cost/performance mix, we will build the application using the latest Intel edge AI vision processing capabilities.
In particular, we will cover the following:
- Computer Vision System Design
- Build the application
- Configure the modules
- Deploy the Application to the Edge Device
- Local Configuration of the Application
- View the Output Video Stream
- Get Started
View the video tutorial here:
Computer Vision System Design
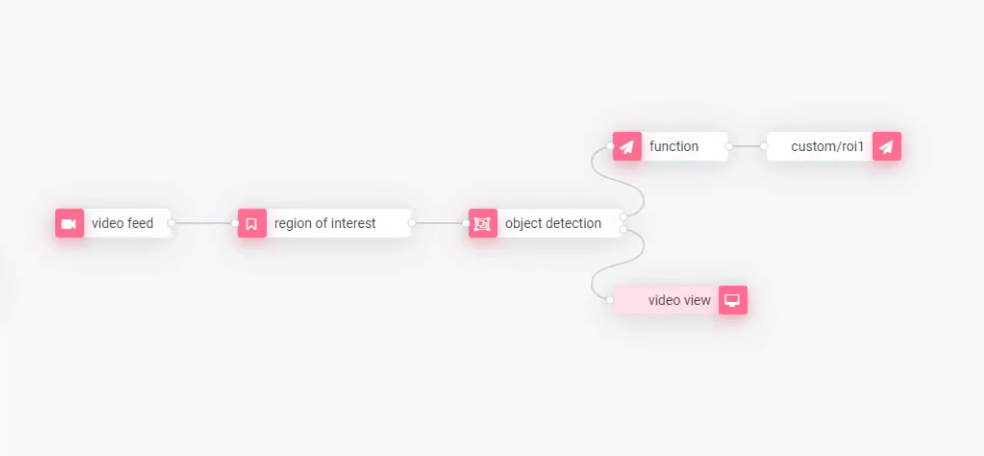
The AI vision application is based on a series of steps to generate insights in real-time based on the video input. We will need the following modules in the Viso No-Code Builder to create the application.
- Video input: The data input is video image frames, either a camera or video file.
- Parking lot areas: In the video frame, we outline the individual parking spaces.
- Vehicle detection: Object detector model to recognize vehicles and their positions.
- Function logic: For each parking lot, the application checks if it is vacant or occupied by a detected vehicle.
- Insights output: Information about the occupancy of each parking space.
- Video output preview: For testing, we preview the video output on a local level.
Using the computer vision platform Viso, the application is cross-platform and hardware compatible. The ability to run the application on highly optimized and efficient AI hardware leads to significant cost savings and performance gains. For the AI inference tasks, you can run the application on Intel CPU (the i-family or Xeon), Intel Neural Compute Stick NCS, the Vision Processing Unit (VPU), or GPU, including the dedicated GPU Xe family that Intel just released.
Build the application
Find the modules in the side panel of the Viso No-code editor. Drag-and-drop each of them onto the canvas and connect them to build the computer vision pipeline as follows. The video feed provides the image input (video file or physical camera), and the output data can be visualized in computer vision dashboards.
Because we build computer vision, we wouldn’t depend on a human operator to view the output (human vision). However, we can view an output video stream to see if the application works as expected.
Configure the modules
Next, we need to configure the connected modules one by one by double-clicking them. You can use the user interface to set the parameters – just like developers would do in code. But all the dependencies are managed automatically, and it’s significantly more intuitive and faster, also to make changes to the application later.
Video feed: Set the video input node that sends the image frames into the computer vision pipeline. You can select a physical camera (IP camera, surveillance camera, USB camera webcams, etc.) or a video file (managed in the workspace video gallery, self-hosted, or externally hosted). We use a video file and loop it to simulate the camera input.
Region of interest: We will set multiple areas of interest to mark the individual parking spaces. This step varies on a local level because it’s different for every camera. Hence, we will set them later in the process.
Object detection: The object detector used deep learning to recognize and localize specific objects in images. We use it to detect the vehicles in the video scene and recognize if the parking spaces are vacant or occupied. With Viso Suite, you can switch the entire AI framework and processing hardware which is critical to update and migrate the application in the future.
Select the AI Framework: Select the Intel OpenVINO Framework. We could also select TensorFlow or PyTorch, but OpenVINO suits best for our use case. We choose the hardware of the edge device to run the application. We use an Intel Myriad X vision processing unit (VPU) for this tutorial. The deep learning accelerator is optimized for using neural networks in vision processing tasks. We could also run our application using the CPU or GPU/iGPU, depending on the hardware configuration of the device/servers you intend to use.
Select the AI model: Next, we select the object detection model that we use to detect the cars. We pick the “OV Vehicle Detection 0201” ML model that is already optimized for edge deployments. Then, we select the classes that the machine learning model is supposed to detect. In our case, it’s the class “vehicle.”
Video output node: Configure the local endpoint that we use to preview the output video stream.
Output logic: We have to manage the output datastream of the machine learning model. Hence, we have to create an output logic to convert into a useful format to query in dashboards (for example, in the built-in Viso Dashboard builder).
We use the MQTT Output node to manage the IoT messaging of the endpoint to the Viso Timeseries Database. The database connector is already built-in. We only need to subscribe the endpoint to a topic. The data is sent from the edge to the cloud and can be visualized continually. The event-driven output data can be used in filterable real-time dashboards. Hence, Viso allows data aggregation across a high number of distributed edge endpoints.
Deploy the Application to the Edge Device
We save the application, assign it to a deployment profile and deploy it to an enrolled edge device. The Viso Solution Manager handles the entire deployment pipeline and dependency management for you. You can modify and update applications to create new versions and roll them out to multiple devices.
Local Configuration of the Application
Before the application sends meaningful results, we need to set the region of interest. Because the parking spaces look differently per camera, we need to configure them on the local level. Access the device in Viso Suite and find the local configuration option.
Manage to the region of interest node, and you see the interface to draw the areas for the parking lots. Naming the parking spaces makes it possible to identify which parking lots are available and where they are located within the image. Save the configuration.
View the Output Video Stream
After the application is configured, you can preview the video output of the computer vision pipeline. You can access it also from the device. To access the local preview, the current device we use to access Viso Suite needs to be in the same network as the edge device.
Note that it is recommended to remove the video output node in a production setting (privacy and resource optimization). You can do so by simply removing it from the application flow.

Get Started
Viso Suite allows using the latest AI hardware from Intel, which allows high-performance applications in large-scale, distributed computer vision systems. We at viso.ai partner with Intel to continuously integrate the latest processing hardware, cross-platform compatibility, and edge-cloud infrastructure – to ensure you will never hit a wall.
To get started with Viso Suite, get in touch with us. Learn how you and your team can develop and scale all your AI vision applications faster, secure, and future-proof, using the only end-to-end computer vision platform. Depending on your needs, we provide full AI vision solution consulting, image annotation, and AI requirements engineering services with our team of ML engineers and computer vision experts.
