

Detecting the presence of people and persons is a common safety requirement in public places. This tutorial is taken from the official PyTorch docs, and shows you how to achieve that by detecting pedestrians in a picture.
This tutorial is originally published as part of PyTorch.
To get the most of this tutorial, we suggest using this Colab Version. This will allow you to experiment with the information presented below.
For this tutorial, we will be finetuning a pre-trained Mask R-CNN model in the Penn-Fudan Database for Pedestrian Detection and Segmentation. It contains 170 images with 345 instances of pedestrians, and we will use it to illustrate how to use the new features in torchvision in order to train an instance segmentation model on a custom dataset.
Defining the Dataset
The reference scripts for training object detection, instance segmentation and person keypoint detection allows for easily supporting adding new custom datasets. The dataset should inherit from the standard torch.utils.data.Dataset class, and implement __len__ and __getitem__.
The only specificity that we require is that the dataset __getitem__ should return:
- image: a PIL Image of size
(H, W) - target: a dict containing the following fields
boxes (FloatTensor[N, 4]): the coordinates of theNbounding boxes in[x0, y0, x1, y1]format, ranging from0toWand0toHlabels (Int64Tensor[N]): the label for each bounding box.0represents always the background class.image_id (Int64Tensor[1]): an image identifier. It should be unique between all the images in the dataset, and is used during evaluationarea (Tensor[N]): The area of the bounding box. This is used during evaluation with the COCO metric, to separate the metric scores between small, medium and large boxes.iscrowd (UInt8Tensor[N]): instances with iscrowd=True will be ignored during evaluation.- (optionally)
masks (UInt8Tensor[N, H, W]): The segmentation masks for each one of the objects - (optionally)
keypoints (FloatTensor[N, K, 3]): For each one of the N objects, it contains the K keypoints in[x, y, visibility]format, defining the object. visibility=0 means that the keypoint is not visible. Note that for data augmentation, the notion of flipping a keypoint is dependent on the data representation, and you should probably adaptreferences/detection/transforms.pyfor your new keypoint representation
If your model returns the above methods, they will make it work for both training and evaluation, and will use the evaluation scripts from pycocotools which can be installed with pip install pycocotools.
For Windows, please install
pycocotoolsfrom gautamchitnis with commandpip install git+https://github.com/gautamchitnis/cocoapi.git@cocodataset-master#subdirectory=PythonAPI
One note on the labels. The model considers class 0 as background. If your dataset does not contain the background class, you should not have 0 in your labels. For example, assuming you have just two classes, cat and dog, you can define 1 (not 0) to represent cats and 2 to represent dogs. So, for instance, if one of the images has both classes, your labels tensor should look like [1,2].
Additionally, if you want to use aspect ratio grouping during training (so that each batch only contains images with similar aspect ratios), then it is recommended to also implement a get_height_and_width method, which returns the height and the width of the image. If this method is not provided, we query all elements of the dataset via __getitem__ , which loads the image in memory and is slower than if a custom method is provided.
Writing a custom dataset for PennFudan
Let’s write a dataset for the PennFudan dataset. After downloading and extracting the zip file, we have the following folder structure:
PennFudanPed/
  PedMasks/
    FudanPed00001_mask.png
    FudanPed00002_mask.png
    FudanPed00003_mask.png
    FudanPed00004_mask.png
    ...
  PNGImages/
    FudanPed00001.png
    FudanPed00002.png
    FudanPed00003.png
    FudanPed00004.png
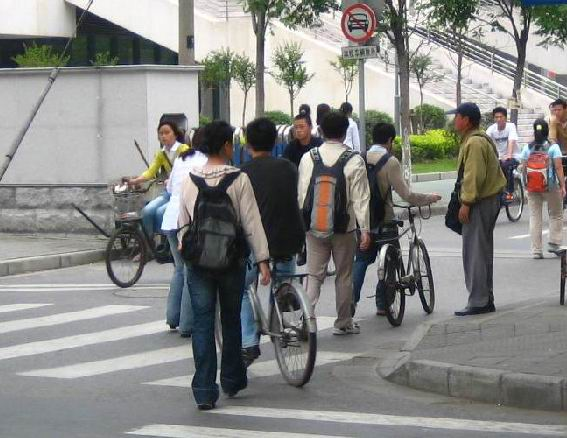
Here is one example of a pair of images and segmentation masks

So each image has a corresponding segmentation mask, where each color correspond to a different instance. Let’s write a torch.utils.data.Dataset class for this dataset.
import os
import numpy as np
import torch
from PIL import Image


class PennFudanDataset(torch.utils.data.Dataset):
    def __init__(self, root, transforms):
        self.root = root
        self.transforms = transforms
        # load all image files, sorting them to
        # ensure that they are aligned
        self.imgs = list(sorted(os.listdir(os.path.join(root, "PNGImages"))))
        self.masks = list(sorted(os.listdir(os.path.join(root, "PedMasks"))))

    def __getitem__(self, idx):
        # load images and masks
        img_path = os.path.join(self.root, "PNGImages", self.imgs[idx])
        mask_path = os.path.join(self.root, "PedMasks", self.masks[idx])
        img = Image.open(img_path).convert("RGB")
        # note that we haven't converted the mask to RGB,
        # because each color corresponds to a different instance
        # with 0 being background
        mask = Image.open(mask_path)
        # convert the PIL Image into a numpy array
        mask = np.array(mask)
        # instances are encoded as different colors
        obj_ids = np.unique(mask)
        # first id is the background, so remove it
        obj_ids = obj_ids[1:]

        # split the color-encoded mask into a set
        # of binary masks
        masks = mask == obj_ids[:, None, None]

        # get bounding box coordinates for each mask
        num_objs = len(obj_ids)
        boxes = []
        for i in range(num_objs):
            pos = np.where(masks[i])
            xmin = np.min(pos[1])
            xmax = np.max(pos[1])
            ymin = np.min(pos[0])
            ymax = np.max(pos[0])
            boxes.append([xmin, ymin, xmax, ymax])

        # convert everything into a torch.Tensor
        boxes = torch.as_tensor(boxes, dtype=torch.float32)
        # there is only one class
        labels = torch.ones((num_objs,), dtype=torch.int64)
        masks = torch.as_tensor(masks, dtype=torch.uint8)

        image_id = torch.tensor([idx])
        area = (boxes[:, 3] - boxes[:, 1]) * (boxes[:, 2] - boxes[:, 0])
        # suppose all instances are not crowd
        iscrowd = torch.zeros((num_objs,), dtype=torch.int64)

        target = {}
        target["boxes"] = boxes
        target["labels"] = labels
        target["masks"] = masks
        target["image_id"] = image_id
        target["area"] = area
        target["iscrowd"] = iscrowd

        if self.transforms is not None:
            img, target = self.transforms(img, target)

        return img, target

    def __len__(self):
        return len(self.imgs)
That’s all for the dataset. Now let’s define a model that can perform predictions on this dataset.
Defining Your Model
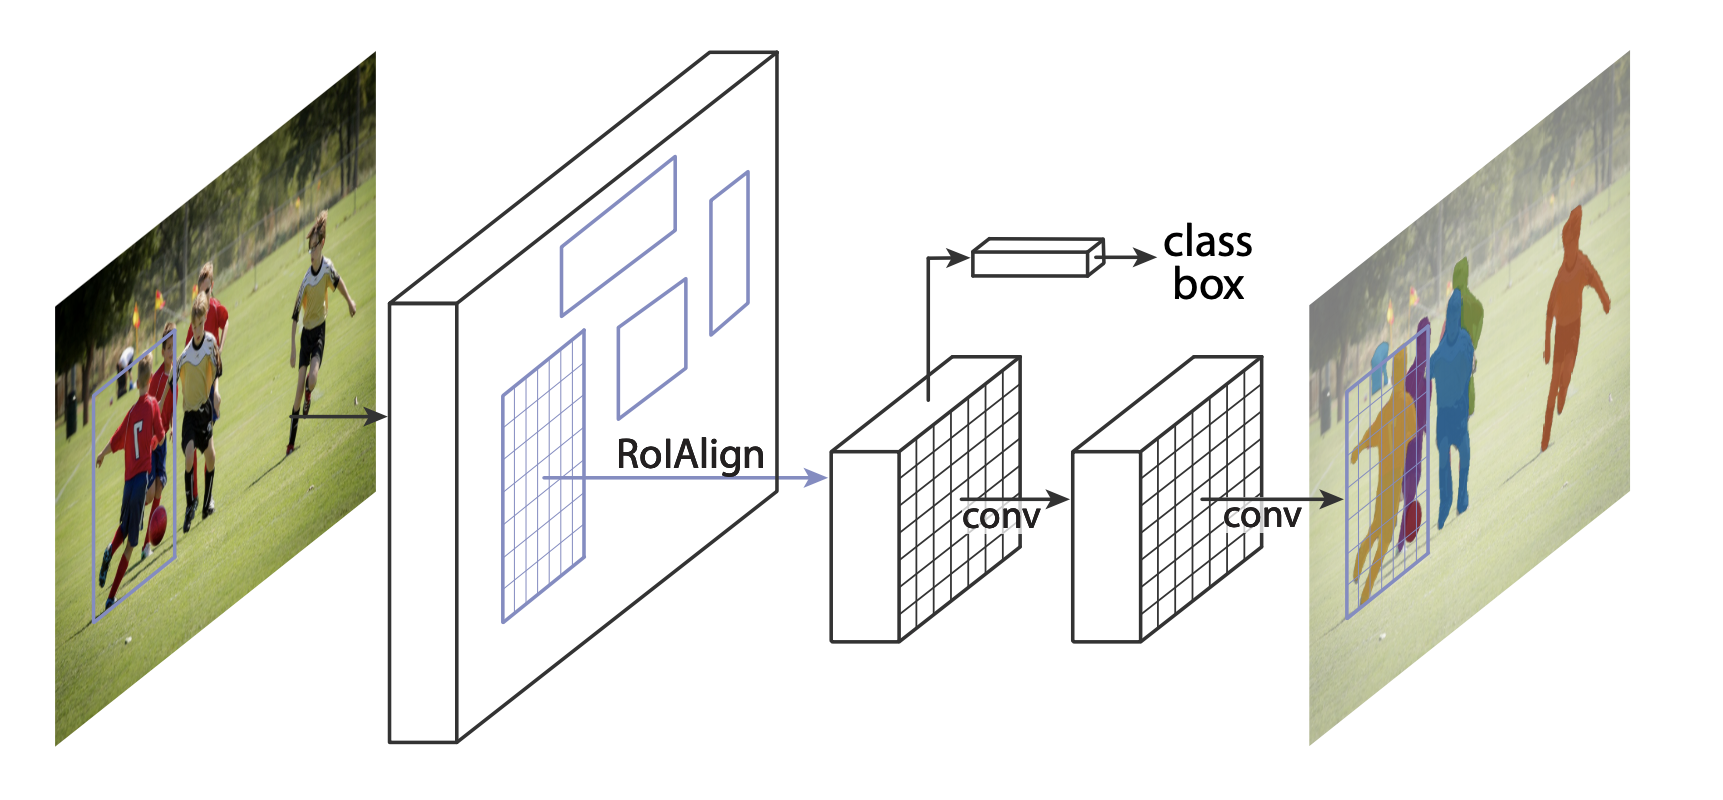
In this tutorial, we will be using Mask R-CNN, which is based on top of Faster R-CNN. Faster R-CNN is a model that predicts both bounding boxes and class scores for potential objects in the image.
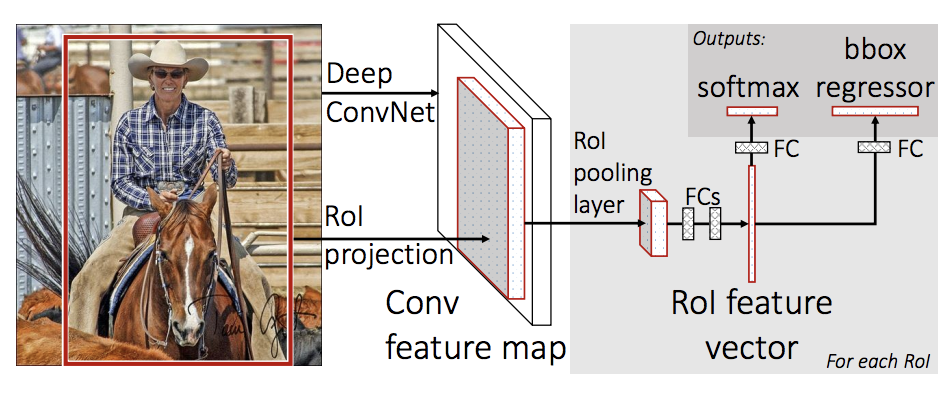
Mask R-CNN adds an extra branch into Faster R-CNN, which also predicts segmentation masks for each instance.
There are two common situations where one might want to modify one of the available models in torchvision modelzoo. The first is when we want to start from a pre-trained model, and just finetune the last layer. The other is when we want to replace the backbone of the model with a different one (for faster predictions, for example).
Let’s go see how we would do one or another in the following sections.
1 – Finetuning from a pretrained model
Let’s suppose that you want to start from a model pre-trained on COCO and want to finetune it for your particular classes. Here is a possible way of doing it:
import torchvision
from torchvision.models.detection.faster_rcnn import FastRCNNPredictor

# load a model pre-trained on COCO
model = torchvision.models.detection.fasterrcnn_resnet50_fpn(pretrained=True)

# replace the classifier with a new one, that has
# num_classes which is user-defined
num_classes = 2  # 1 class (person) + background
# get number of input features for the classifier
in_features = model.roi_heads.box_predictor.cls_score.in_features
# replace the pre-trained head with a new one
model.roi_heads.box_predictor = FastRCNNPredictor(in_features, num_classes)
2 – Modifying the model to add a different backbone
import torchvision
from torchvision.models.detection import FasterRCNN
from torchvision.models.detection.rpn import AnchorGenerator

# load a pre-trained model for classification and return
# only the features
backbone = torchvision.models.mobilenet_v2(pretrained=True).features
# FasterRCNN needs to know the number of
# output channels in a backbone. For mobilenet_v2, it's 1280
# so we need to add it here
backbone.out_channels = 1280

# let's make the RPN generate 5 x 3 anchors per spatial
# location, with 5 different sizes and 3 different aspect
# ratios. We have a Tuple[Tuple[int]] because each feature
# map could potentially have different sizes and
# aspect ratios
anchor_generator = AnchorGenerator(sizes=((32, 64, 128, 256, 512),),
                                   aspect_ratios=((0.5, 1.0, 2.0),))

# let's define what are the feature maps that we will
# use to perform the region of interest cropping, as well as
# the size of the crop after rescaling.
# if your backbone returns a Tensor, featmap_names is expected to
# be [0]. More generally, the backbone should return an
# OrderedDict[Tensor], and in featmap_names you can choose which
# feature maps to use.
roi_pooler = torchvision.ops.MultiScaleRoIAlign(featmap_names=['0'],
                                                output_size=7,
                                                sampling_ratio=2)

# put the pieces together inside a FasterRCNN model
model = FasterRCNN(backbone,
                   num_classes=2,
                   rpn_anchor_generator=anchor_generator,
                   box_roi_pool=roi_pooler)
An Instance segmentation model for PennFudan Dataset
In our case, we want to fine-tune from a pre-trained model, given that our dataset is very small, so we will be following approach number 1.
Here we want to also compute the instance segmentation masks, so we will be using Mask R-CNN:
import torchvision
from torchvision.models.detection.faster_rcnn import FastRCNNPredictor
from torchvision.models.detection.mask_rcnn import MaskRCNNPredictor


def get_model_instance_segmentation(num_classes):
    # load an instance segmentation model pre-trained on COCO
    model = torchvision.models.detection.maskrcnn_resnet50_fpn(pretrained=True)

    # get number of input features for the classifier
    in_features = model.roi_heads.box_predictor.cls_score.in_features
    # replace the pre-trained head with a new one
    model.roi_heads.box_predictor = FastRCNNPredictor(in_features, num_classes)

    # now get the number of input features for the mask classifier
    in_features_mask = model.roi_heads.mask_predictor.conv5_mask.in_channels
    hidden_layer = 256
    # and replace the mask predictor with a new one
    model.roi_heads.mask_predictor = MaskRCNNPredictor(in_features_mask,
                                                       hidden_layer,
                                                       num_classes)

    return model
That’s it, this will make model be ready to be trained and evaluated on your custom dataset.
Putting Everything Together
In references/detection/, we have a number of helper functions to simplify training and evaluating detection models. Here, we will use references/detection/engine.py, references/detection/utils.py and references/detection/transforms.py. Just copy everything under references/detection to your folder and use them here.
Let’s write some helper functions for data augmentation / transformation:
import transforms as T

def get_transform(train):
    transforms = []
    transforms.append(T.ToTensor())
    if train:
        transforms.append(T.RandomHorizontalFlip(0.5))
    return T.Compose(transforms)
Testing forward() method (Optional)
Before iterating over the dataset, it’s good to see what the model expects during training and inference time on sample data.
model = torchvision.models.detection.fasterrcnn_resnet50_fpn(pretrained=True)
dataset = PennFudanDataset('PennFudanPed', get_transform(train=True))
data_loader = torch.utils.data.DataLoader(
 dataset, batch_size=2, shuffle=True, num_workers=4,
 collate_fn=utils.collate_fn)
# For Training
images,targets = next(iter(data_loader))
images = list(image for image in images)
targets = [{k: v for k, v in t.items()} for t in targets]
output = model(images,targets)   # Returns losses and detections
# For inference
model.eval()
x = [torch.rand(3, 300, 400), torch.rand(3, 500, 400)]
predictions = model(x)           # Returns predictions
Let’s now write the main function which performs the training and the validation:
from engine import train_one_epoch, evaluate
import utils


def main():
    # train on the GPU or on the CPU, if a GPU is not available
    device = torch.device('cuda') if torch.cuda.is_available() else torch.device('cpu')

    # our dataset has two classes only - background and person
    num_classes = 2
    # use our dataset and defined transformations
    dataset = PennFudanDataset('PennFudanPed', get_transform(train=True))
    dataset_test = PennFudanDataset('PennFudanPed', get_transform(train=False))

    # split the dataset in train and test set
    indices = torch.randperm(len(dataset)).tolist()
    dataset = torch.utils.data.Subset(dataset, indices[:-50])
    dataset_test = torch.utils.data.Subset(dataset_test, indices[-50:])

    # define training and validation data loaders
    data_loader = torch.utils.data.DataLoader(
        dataset, batch_size=2, shuffle=True, num_workers=4,
        collate_fn=utils.collate_fn)

    data_loader_test = torch.utils.data.DataLoader(
        dataset_test, batch_size=1, shuffle=False, num_workers=4,
        collate_fn=utils.collate_fn)

    # get the model using our helper function
    model = get_model_instance_segmentation(num_classes)

    # move model to the right device
    model.to(device)

    # construct an optimizer
    params = [p for p in model.parameters() if p.requires_grad]
    optimizer = torch.optim.SGD(params, lr=0.005,
                                momentum=0.9, weight_decay=0.0005)
    # and a learning rate scheduler
    lr_scheduler = torch.optim.lr_scheduler.StepLR(optimizer,
                                                   step_size=3,
                                                   gamma=0.1)

    # let's train it for 10 epochs
    num_epochs = 10

    for epoch in range(num_epochs):
        # train for one epoch, printing every 10 iterations
        train_one_epoch(model, optimizer, data_loader, device, epoch, print_freq=10)
        # update the learning rate
        lr_scheduler.step()
        # evaluate on the test dataset
        evaluate(model, data_loader_test, device=device)

    print("That's it!")
You should get as output for the first epoch:
Epoch: [0]  [ 0/60]  eta: 0:01:18  lr: 0.000090  loss: 2.5213 (2.5213)  loss_classifier: 0.8025 (0.8025)  loss_box_reg: 0.2634 (0.2634)  loss_mask: 1.4265 (1.4265)  loss_objectness: 0.0190 (0.0190)  loss_rpn_box_reg: 0.0099 (0.0099)  time: 1.3121  data: 0.3024  max mem: 3485
Epoch: [0]  [10/60]  eta: 0:00:20  lr: 0.000936  loss: 1.3007 (1.5313)  loss_classifier: 0.3979 (0.4719)  loss_box_reg: 0.2454 (0.2272)  loss_mask: 0.6089 (0.7953)  loss_objectness: 0.0197 (0.0228)  loss_rpn_box_reg: 0.0121 (0.0141)  time: 0.4198  data: 0.0298  max mem: 5081
Epoch: [0]  [20/60]  eta: 0:00:15  lr: 0.001783  loss: 0.7567 (1.1056)  loss_classifier: 0.2221 (0.3319)  loss_box_reg: 0.2002 (0.2106)  loss_mask: 0.2904 (0.5332)  loss_objectness: 0.0146 (0.0176)  loss_rpn_box_reg: 0.0094 (0.0123)  time: 0.3293  data: 0.0035  max mem: 5081
Epoch: [0]  [30/60]  eta: 0:00:11  lr: 0.002629  loss: 0.4705 (0.8935)  loss_classifier: 0.0991 (0.2517)  loss_box_reg: 0.1578 (0.1957)  loss_mask: 0.1970 (0.4204)  loss_objectness: 0.0061 (0.0140)  loss_rpn_box_reg: 0.0075 (0.0118)  time: 0.3403  data: 0.0044  max mem: 5081
Epoch: [0]  [40/60]  eta: 0:00:07  lr: 0.003476  loss: 0.3901 (0.7568)  loss_classifier: 0.0648 (0.2022)  loss_box_reg: 0.1207 (0.1736)  loss_mask: 0.1705 (0.3585)  loss_objectness: 0.0018 (0.0113)  loss_rpn_box_reg: 0.0075 (0.0112)  time: 0.3407  data: 0.0044  max mem: 5081
Epoch: [0]  [50/60]  eta: 0:00:03  lr: 0.004323  loss: 0.3237 (0.6703)  loss_classifier: 0.0474 (0.1731)  loss_box_reg: 0.1109 (0.1561)  loss_mask: 0.1658 (0.3201)  loss_objectness: 0.0015 (0.0093)  loss_rpn_box_reg: 0.0093 (0.0116)  time: 0.3379  data: 0.0043  max mem: 5081
Epoch: [0]  [59/60]  eta: 0:00:00  lr: 0.005000  loss: 0.2540 (0.6082)  loss_classifier: 0.0309 (0.1526)  loss_box_reg: 0.0463 (0.1405)  loss_mask: 0.1568 (0.2945)  loss_objectness: 0.0012 (0.0083)  loss_rpn_box_reg: 0.0093 (0.0123)  time: 0.3489  data: 0.0042  max mem: 5081
Epoch: [0] Total time: 0:00:21 (0.3570 s / it)
creating index...
index created!
Test:  [ 0/50]  eta: 0:00:19  model_time: 0.2152 (0.2152)  evaluator_time: 0.0133 (0.0133)  time: 0.4000  data: 0.1701  max mem: 5081
Test:  [49/50]  eta: 0:00:00  model_time: 0.0628 (0.0687)  evaluator_time: 0.0039 (0.0064)  time: 0.0735  data: 0.0022  max mem: 5081
Test: Total time: 0:00:04 (0.0828 s / it)
Averaged stats: model_time: 0.0628 (0.0687)  evaluator_time: 0.0039 (0.0064)
Accumulating evaluation results...
DONE (t=0.01s).
Accumulating evaluation results...
DONE (t=0.01s).
IoU metric: bbox
 Average Precision  (AP) @[ IoU=0.50:0.95 | area=   all | maxDets=100 ] = 0.606
 Average Precision  (AP) @[ IoU=0.50      | area=   all | maxDets=100 ] = 0.984
 Average Precision  (AP) @[ IoU=0.75      | area=   all | maxDets=100 ] = 0.780
 Average Precision  (AP) @[ IoU=0.50:0.95 | area= small | maxDets=100 ] = 0.313
 Average Precision  (AP) @[ IoU=0.50:0.95 | area=medium | maxDets=100 ] = 0.582
 Average Precision  (AP) @[ IoU=0.50:0.95 | area= large | maxDets=100 ] = 0.612
 Average Recall     (AR) @[ IoU=0.50:0.95 | area=   all | maxDets=  1 ] = 0.270
 Average Recall     (AR) @[ IoU=0.50:0.95 | area=   all | maxDets= 10 ] = 0.672
 Average Recall     (AR) @[ IoU=0.50:0.95 | area=   all | maxDets=100 ] = 0.672
 Average Recall     (AR) @[ IoU=0.50:0.95 | area= small | maxDets=100 ] = 0.650
 Average Recall     (AR) @[ IoU=0.50:0.95 | area=medium | maxDets=100 ] = 0.755
 Average Recall     (AR) @[ IoU=0.50:0.95 | area= large | maxDets=100 ] = 0.664
IoU metric: segm
 Average Precision  (AP) @[ IoU=0.50:0.95 | area=   all | maxDets=100 ] = 0.704
 Average Precision  (AP) @[ IoU=0.50      | area=   all | maxDets=100 ] = 0.979
 Average Precision  (AP) @[ IoU=0.75      | area=   all | maxDets=100 ] = 0.871
 Average Precision  (AP) @[ IoU=0.50:0.95 | area= small | maxDets=100 ] = 0.325
 Average Precision  (AP) @[ IoU=0.50:0.95 | area=medium | maxDets=100 ] = 0.488
 Average Precision  (AP) @[ IoU=0.50:0.95 | area= large | maxDets=100 ] = 0.727
 Average Recall     (AR) @[ IoU=0.50:0.95 | area=   all | maxDets=  1 ] = 0.316
 Average Recall     (AR) @[ IoU=0.50:0.95 | area=   all | maxDets= 10 ] = 0.748
 Average Recall     (AR) @[ IoU=0.50:0.95 | area=   all | maxDets=100 ] = 0.749
 Average Recall     (AR) @[ IoU=0.50:0.95 | area= small | maxDets=100 ] = 0.650
 Average Recall     (AR) @[ IoU=0.50:0.95 | area=medium | maxDets=100 ] = 0.673
 Average Recall     (AR) @[ IoU=0.50:0.95 | area= large | maxDets=100 ] = 0.758
So after one epoch of training, we obtain a COCO-style mAP of 60.6, and a mask mAP of 70.4.
After training for 10 epochs, I got the following metrics
IoU metric: bbox
 Average Precision  (AP) @[ IoU=0.50:0.95 | area=   all | maxDets=100 ] = 0.799
 Average Precision  (AP) @[ IoU=0.50      | area=   all | maxDets=100 ] = 0.969
 Average Precision  (AP) @[ IoU=0.75      | area=   all | maxDets=100 ] = 0.935
 Average Precision  (AP) @[ IoU=0.50:0.95 | area= small | maxDets=100 ] = 0.349
 Average Precision  (AP) @[ IoU=0.50:0.95 | area=medium | maxDets=100 ] = 0.592
 Average Precision  (AP) @[ IoU=0.50:0.95 | area= large | maxDets=100 ] = 0.831
 Average Recall     (AR) @[ IoU=0.50:0.95 | area=   all | maxDets=  1 ] = 0.324
 Average Recall     (AR) @[ IoU=0.50:0.95 | area=   all | maxDets= 10 ] = 0.844
 Average Recall     (AR) @[ IoU=0.50:0.95 | area=   all | maxDets=100 ] = 0.844
 Average Recall     (AR) @[ IoU=0.50:0.95 | area= small | maxDets=100 ] = 0.400
 Average Recall     (AR) @[ IoU=0.50:0.95 | area=medium | maxDets=100 ] = 0.777
 Average Recall     (AR) @[ IoU=0.50:0.95 | area= large | maxDets=100 ] = 0.870
IoU metric: segm
 Average Precision  (AP) @[ IoU=0.50:0.95 | area=   all | maxDets=100 ] = 0.761
 Average Precision  (AP) @[ IoU=0.50      | area=   all | maxDets=100 ] = 0.969
 Average Precision  (AP) @[ IoU=0.75      | area=   all | maxDets=100 ] = 0.919
 Average Precision  (AP) @[ IoU=0.50:0.95 | area= small | maxDets=100 ] = 0.341
 Average Precision  (AP) @[ IoU=0.50:0.95 | area=medium | maxDets=100 ] = 0.464
 Average Precision  (AP) @[ IoU=0.50:0.95 | area= large | maxDets=100 ] = 0.788
 Average Recall     (AR) @[ IoU=0.50:0.95 | area=   all | maxDets=  1 ] = 0.303
 Average Recall     (AR) @[ IoU=0.50:0.95 | area=   all | maxDets= 10 ] = 0.799
 Average Recall     (AR) @[ IoU=0.50:0.95 | area=   all | maxDets=100 ] = 0.799
 Average Recall     (AR) @[ IoU=0.50:0.95 | area= small | maxDets=100 ] = 0.400
 Average Recall     (AR) @[ IoU=0.50:0.95 | area=medium | maxDets=100 ] = 0.769
 Average Recall     (AR) @[ IoU=0.50:0.95 | area= large | maxDets=100 ] = 0.818
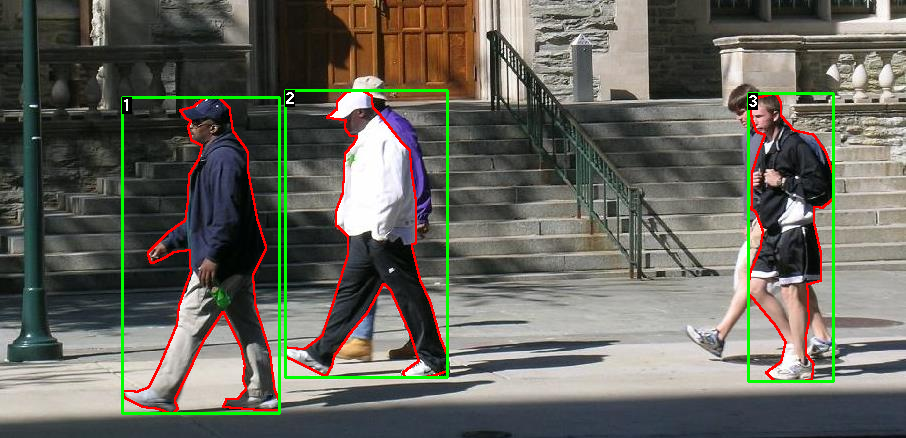
But what do the predictions look like? Let’s take one image in the dataset and verify
The trained model predicts 9 instances of person in this image, let’s see a couple of them:
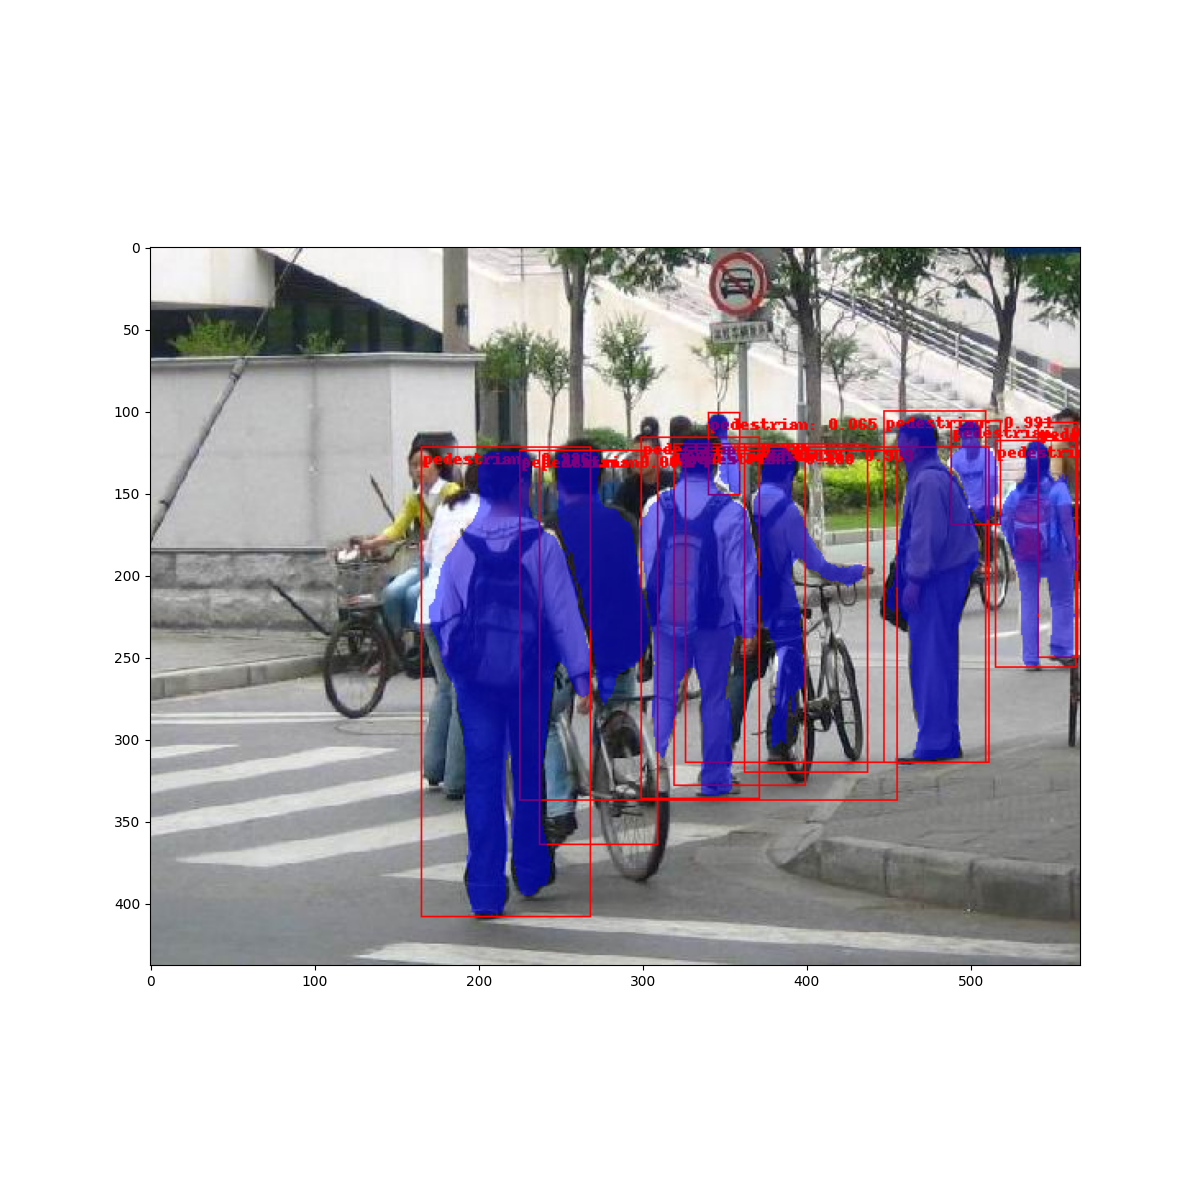

The results look pretty good!
Wrapping Up
In this tutorial, you have learned how to create your own training pipeline for instance segmentation models, on a custom dataset. For that, you wrote a torch.utils.data.Dataset class that returns the images and the ground truth boxes and segmentation masks. You also leveraged a Mask R-CNN model pre-trained on COCO train2017 in order to perform transfer learning on this new dataset.
For a more complete example, which includes multi-machine / multi-gpu training, check references/detection/train.py, which is present in the torchvision repo.
You can download a full source file for this tutorial here.
