

In this blog post, we cover the I2C interface of Raspberry Pi. Similar to the SPI, I2C also offers the flexibility of interfacing multiple slave devices and has some added advantages. Read on to know more about how to program I2C in Raspberry Pi.
I2C: Inter-Integrated Circuit Communication
I²C or Inter-integrated Circuit protocol is a hardware protocol designed to allow multiple, slave integrated circuits to communicate with one or more master. It uses two bidirectional open-drain lines, Serial Data Line (SDA) and Serial Clock Line (SCL), pulled up with resistors. Typical voltages used are +5 V or +3.3 V, although systems with other voltages are permitted.
Comparison between SPI and I2C Communication
If you followed our earlier post on SPI then you can spot the differences with I2C. Let’s take a little more detailed look.
- SPI needs 4 pins for the communication, and additional slave select logic for selecting slaves, whereas I2C requires only 2 pins to connect any number of slaves.
- SPI is good for high data rate full-duplex (simultaneous sending and receiving of data) connections, supporting clock rates upwards of 10MHz (and thus, 10 million bits per second) for some devices, and the speed scales nicely.
- Unlike SPI, I2C supports multi-master hardware connection which is useful for industrial applications where one sensor needs to to be controlled and accessed by multiple master devices.
Check Out Our Emerging Technology Use Case Index
Cloud Computing | Artificial Intelligence | Internet of Things | Blockchain | Next Gen Networks | Web
I2C Support in Raspberry Pi 3

Raspberry Pi 3 supports I2C communication. It can support for both single master and multi-master configuration.
In this post, we will make a simple I2C demonstration with Raspberry Pi3 as a single master and two Arduino UNO devices as slaves. So this will be a single master, two slave setup.

Hardware Requirements
You will need the following hardware to execute this project.
- Raspberry Pi 3 Board*
- Arduino UNO* (2 nos.)
- 1 kOhm resistor (2 nos.)
Prerequisites for Raspberry Pi I2C Configuration
If you are using Raspian Linux 3.18 or later, you need to go into the Raspberry Pi config utility and enable I2C.
sudo raspi-config
Select 8 Advanced Options and then A7 I2C – Enable/Disable automatic loading. A prompt will appear asking Would you like the ARM I2C interface to be enabled?, select Yes, exit the utility. Reboot your Raspberry Pi followed by the steps below to install the prerequisite software and drivers.
Step 1: Reboot the Raspberry Pi using following command
sudo reboot
Step 2: Next you need to update your Raspberry Pi to ensure all the latest packages are installed:
sudo apt-get update
sudo apt-get upgrade
sudo apt-get dist-upgrade
Step 3: Once you have logged into your Raspberry Pi from the command line, run the following command to install SMBus and Python Dev:
sudo apt-get install python-smbus python3-smbus python-dev python3-dev
Step 4: From the command line, run the following command to install i2c-tools:
sudo apt-get install i2c-tools
Step 5 (For previous releases of Raspian Linux 3.18 you need to complete this step or skip over to step 6): Enable I2C and SPI protocols. I2C and SPI protocols are turned off in the wheezy distro by default, so you will need to enable them by editing the file /etc/modprobe.d/raspi-blacklist.conf :
sudo nano /etc/modprobe.d/raspi-blacklist.conf
In the file you will see two lines, you need to disable the blacklisting of these by adding a # character before each line:
#blacklist spi-bcm2708
#blacklist i2c-bcm2708
Save your changes and exit the nano editor.
Step 6: For recent versions of the Raspberry Pi (3.18 kernel or later) you will need to update the /boot/config.txt file. Open the file with nano using the command:
sudo nano /boot/config.txt
Add the following text to the bottom of the file:
dtparam=i2c1=on
dtparam=i2c_arm=on
Save your changes and exit the nano editor.
Step 7: Set the Raspberry Pi to start I2C automatically at boot by editing /etc/modules :
sudo nano /etc/modules
Use your cursor keys to move to the last line and add a new line and then add:
i2c-dev
Save your changes and exit the nano editor.
Step 8: To avoid having to run the I2C tools at root, add the ‘pi’ user to the I2C group:
sudo adduser pi i2c
Step 9: Next reboot the Raspberry Pi:
sudo reboot
When your Raspberry Pi has rebooted you will have the I2C and SMBus Python 2 or 3 support. To follow more on SMBus functions, check this link.
Hardware Connection
Before getting into the specifics of the hardware connection, let us define the role that each of the devices plays in this demo.
- Arduino UNO (2 nos.) – Acts as an I2C Slave. Receives data at the I2C interface, sent from the Raspberry Pi and displays it on the Serial Monitor of Arduino UNO.
- Raspberry Pi – Acts as the I2C Master. Takes the data from the user on the terminal and sends to the both the slaves.
We are going to demonstrate I2C communication between the Raspberry Pi and Arduino UNO by sending the user data from the master to all the slaves and displaying it on the serial monitor. Here is the schematic for the hardware connection.
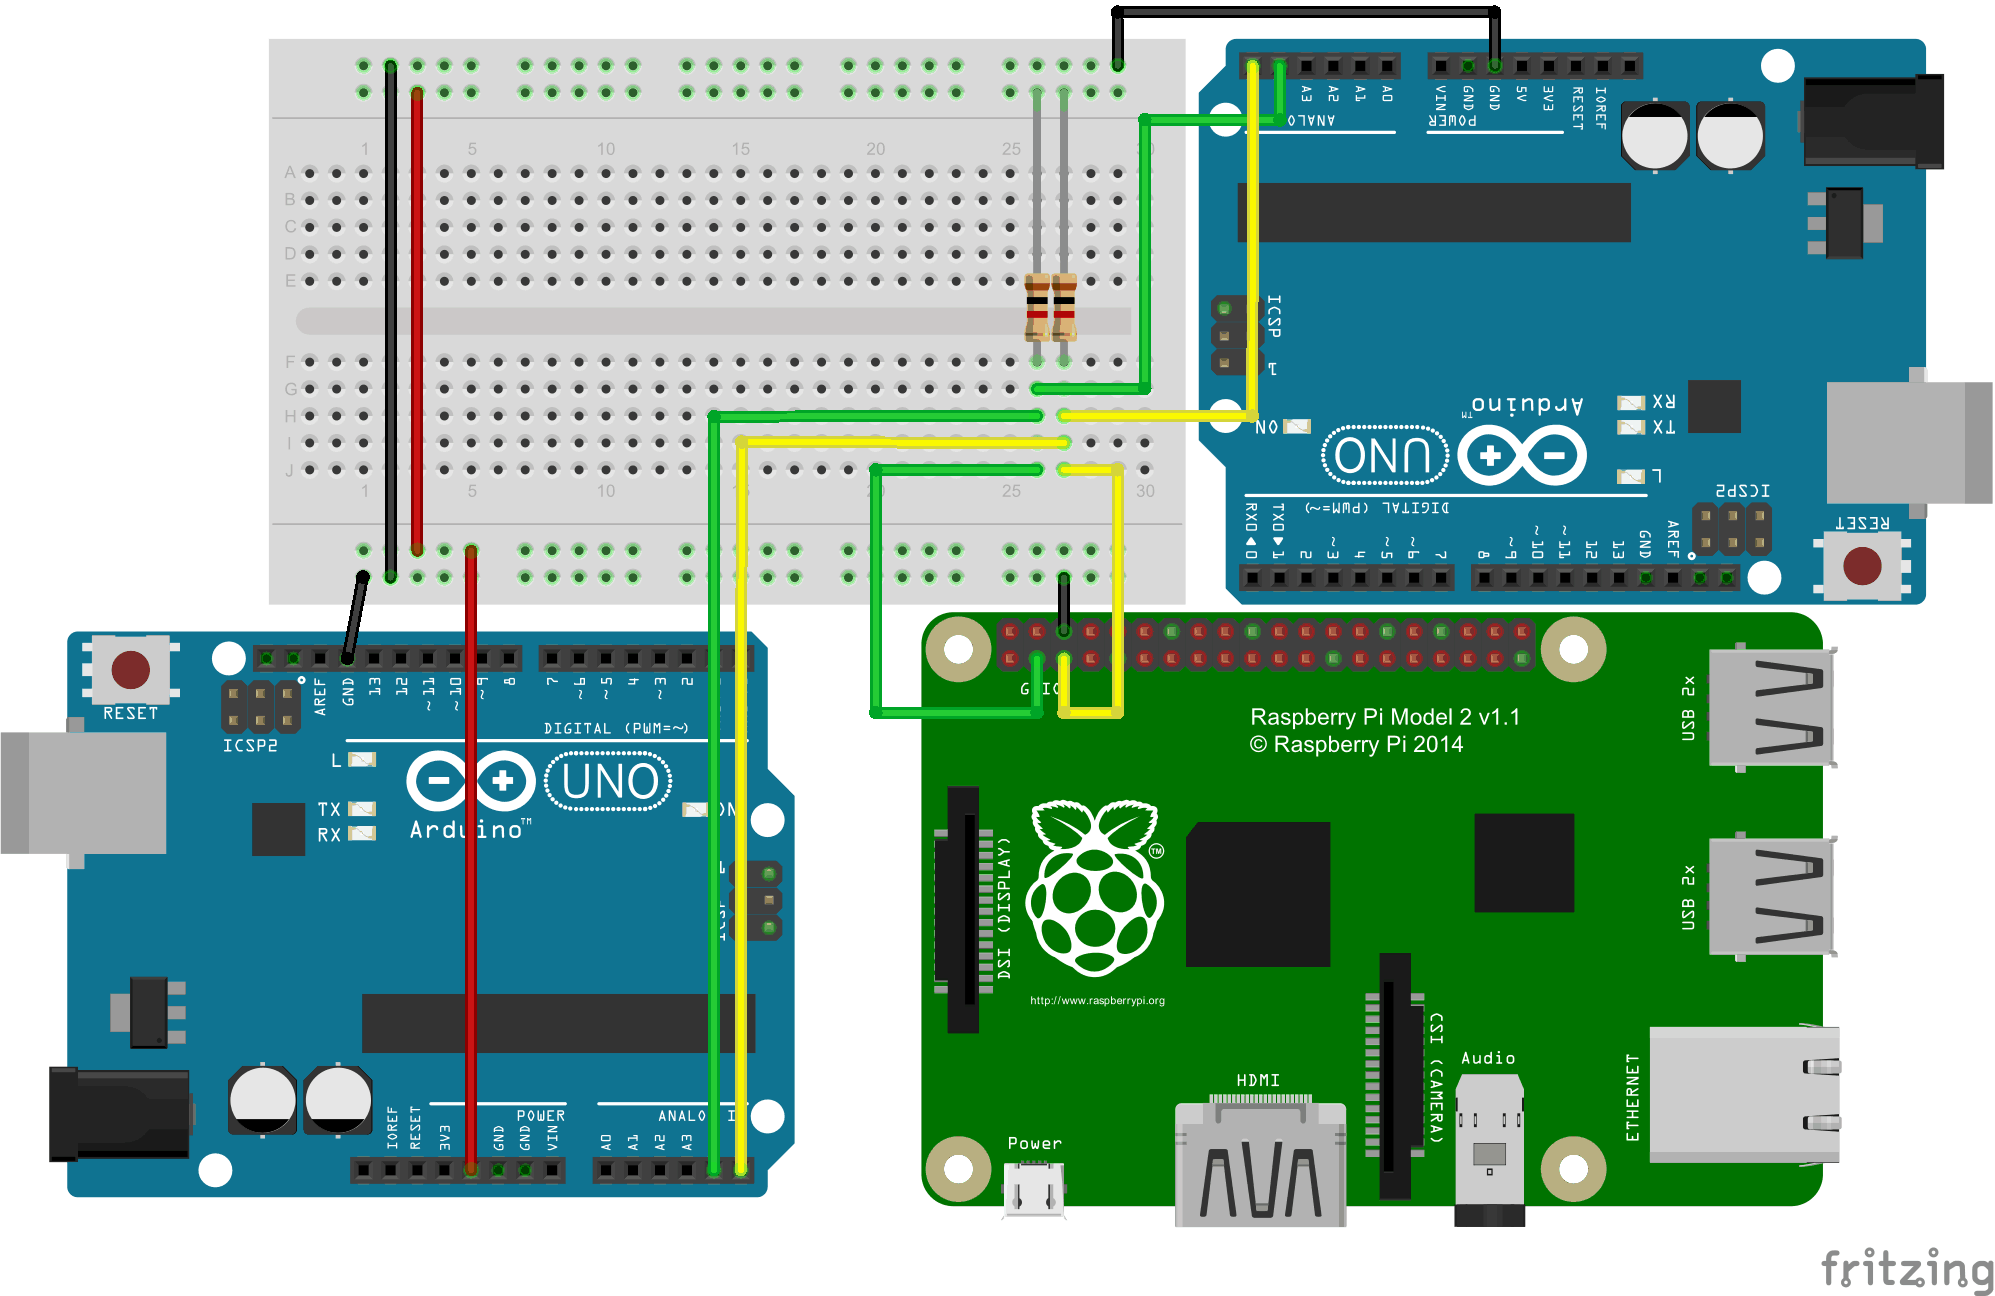
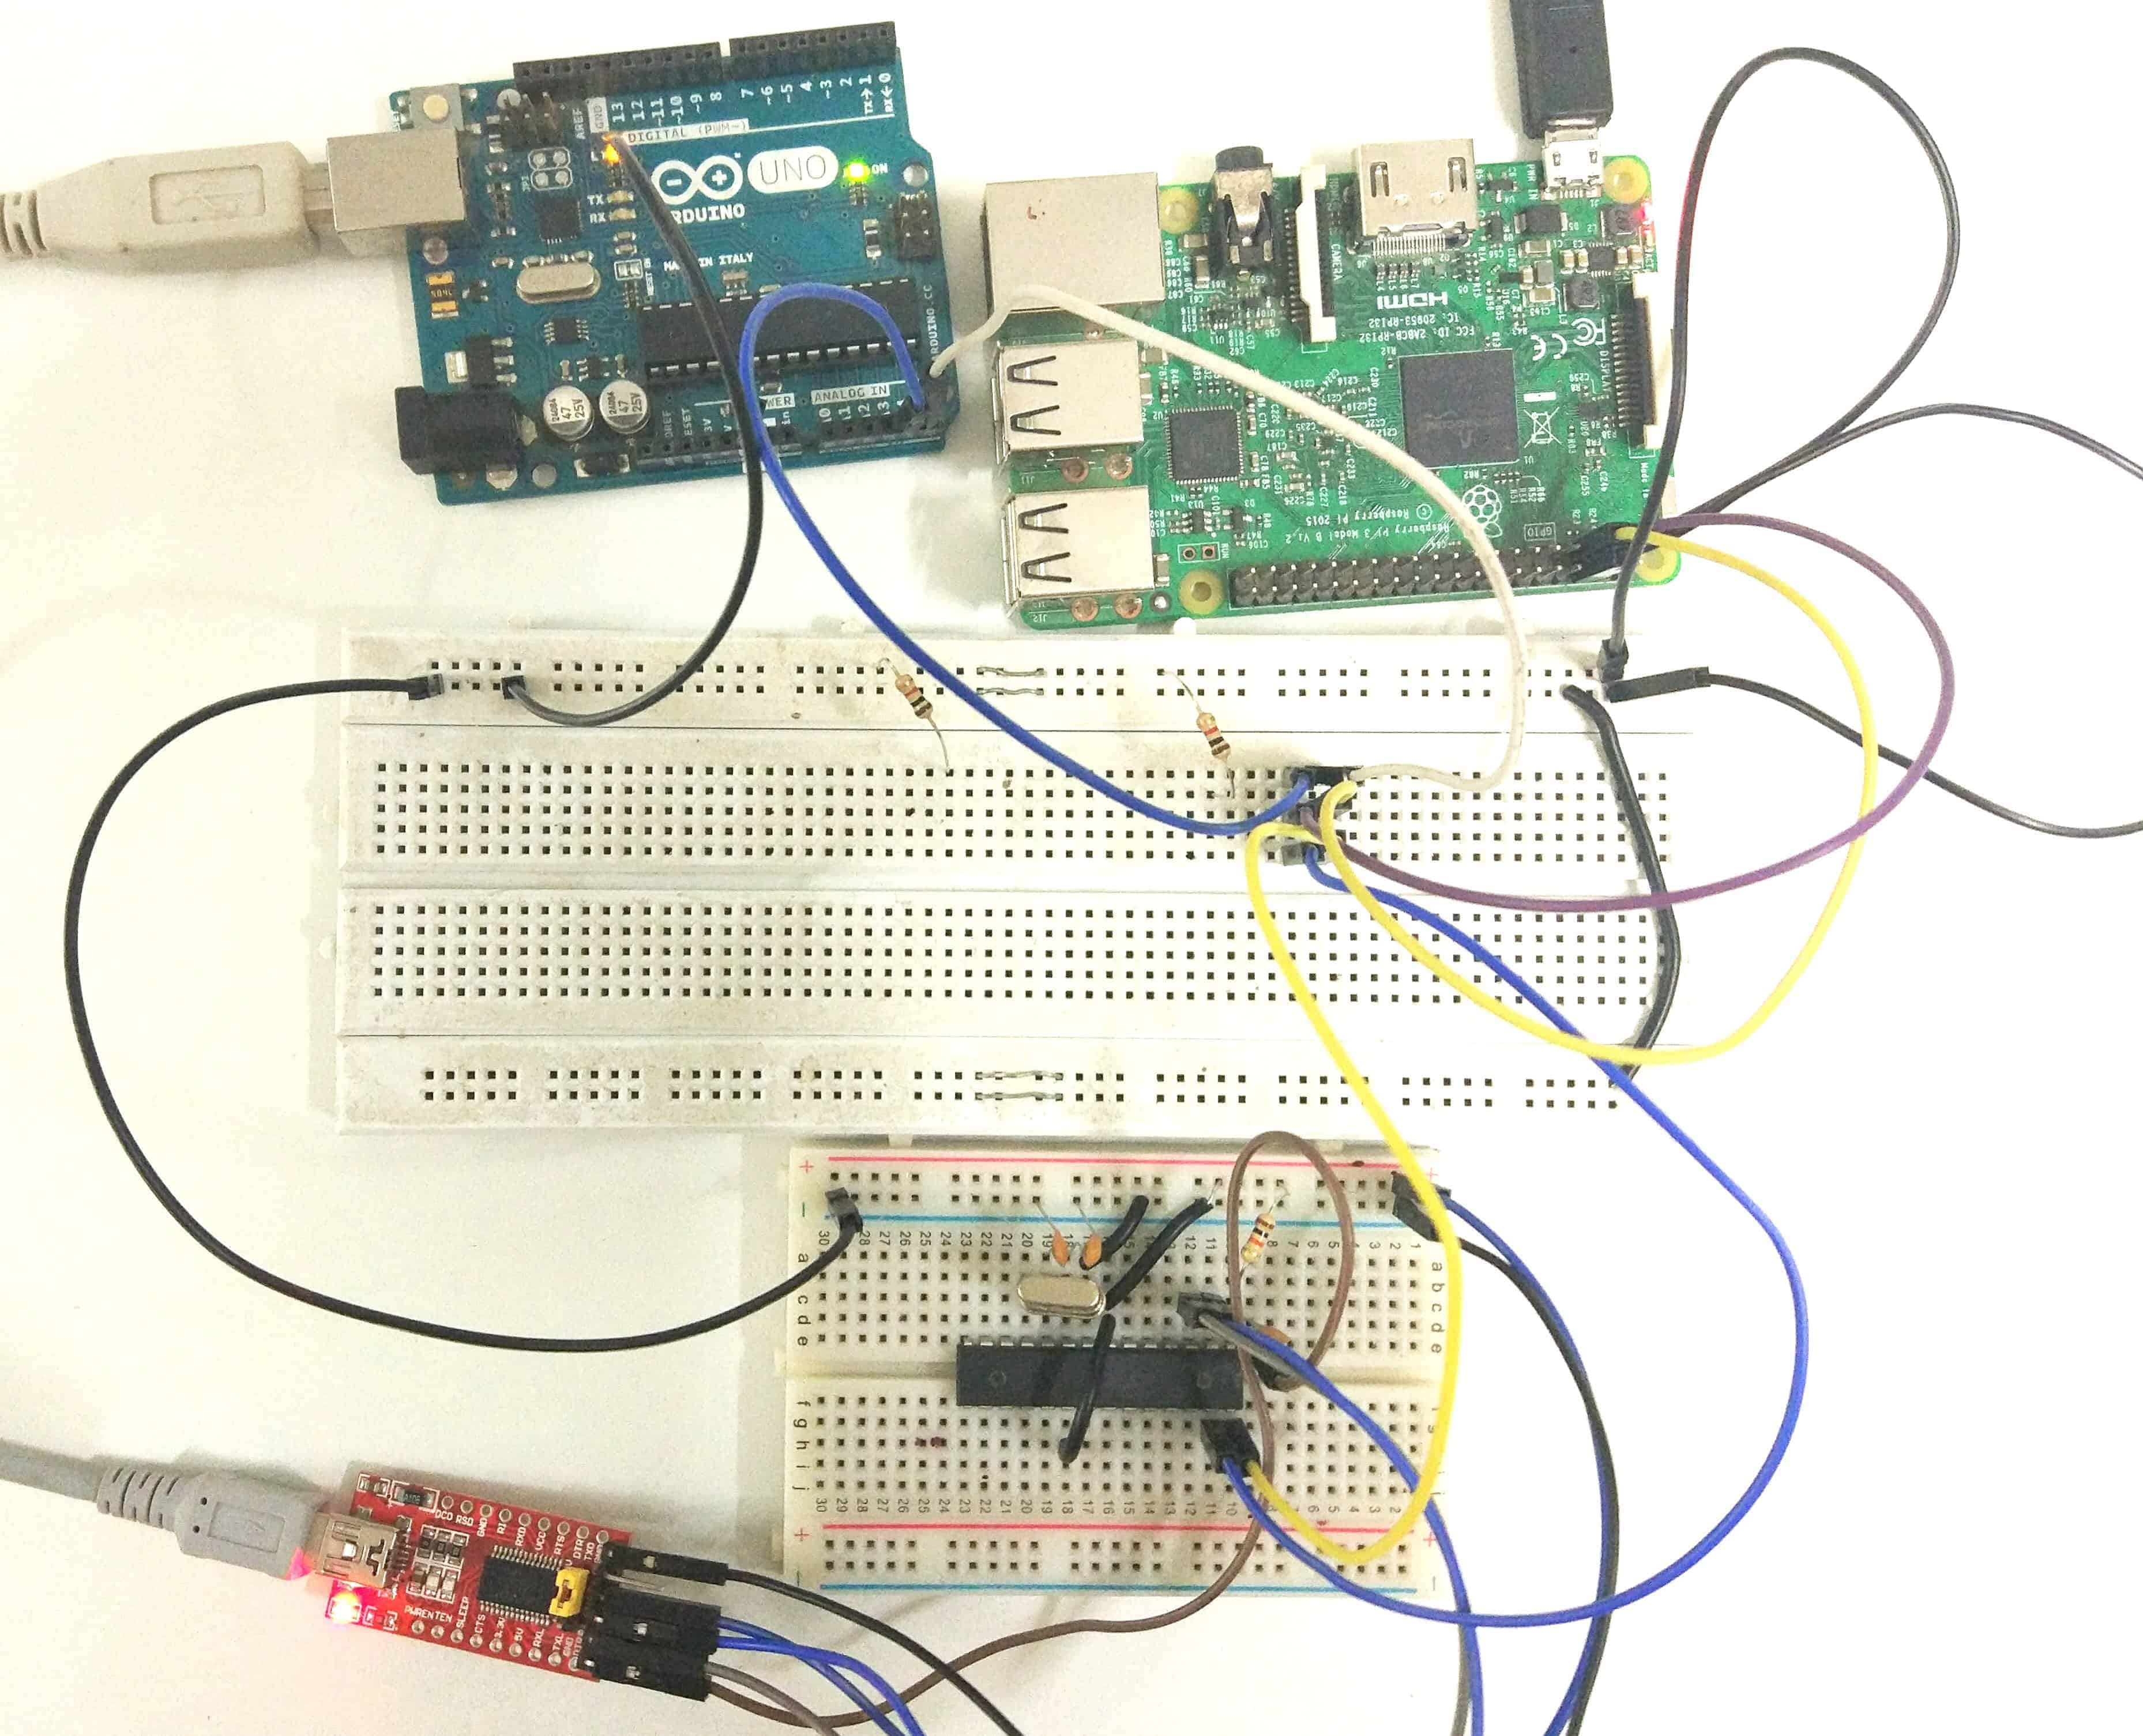
Here, is the actual setup used for the demo. I am using a custom made Arduino UNO setup using Atmeag328p on the breadboard to demonstrate multiple slaves. But you can follow along using two Arduino UNOs as shown above.
Project Demo
Power on the hardware setup and make sure that you can access Arduino UNO via the USB of your computer and can login to Raspberry Pi terminal (via ssh or direct display connection). Your Raspberry Pi should also have the Python interpreter installed.
Arduino Software Build
Before proceeding, we need to install Arduino IDE on the computer from where you will access the Arduino UNO.
Installing the Arduino IDE
– Download and install the latest version of Arduino IDE on your computer. [https://www.arduino.cc/en/Main/Software]
– Start Arduino IDE and plug one of the Arduino UNO board to the USB port of the computer.
Follow the steps below to flash the I2C slave program on the Arduino UNO board.
Step 1: Clone the GitHub repository in the computer, using the following link
git clone https://github.com/suryasundarraj/rpi-series.git
Step 2: Open the file rpi-series/i2c_communication/arduino_i2c_1/arduino_i2c_1.ino from this repo in Arduino IDE
Step 3: Upload the code to the One of the Arduino UNO Board
Step 4: Select the Board from Tools – > Board – > Arduino UNO
Step 5: Select the USB Port from Tools – > Port – > COMXX
Step 6: Upload the Code on both the Arduino UNO boards.
Step 7: Connect the second Arduino UNO and open the file rpi-series/i2c_communication/arduino_i2c_2/arduino_i2c_2.ino and follow the above steps from step 3.
Both Arduino UNOs are now configured as I2C slave devices with distinct addressess. You should keep them connected to the computer with their serial monitor on.
Raspberry Pi Software Build
- Log into the Raspberry Pi console and clone the GitHub repository under the home directory, using the following git command link
git clone https://github.com/suryasundarraj/rpi-series.git
- Under the “rpi-series” navigate to “i2c_communication“. Open the i2c_communication folder using the following command
cd rpi-series
cd
i2c_communication
- Run the script
python rpi_i2c.py
Once you run the python script you will be prompted to key in some data. Go ahead and do it and then you can see the same data being displayed in the serial monitor for both the Arduino UNOs. That’s I2C in action. The Raspberry Pi I2C master sends the data to both the slave devices once it receives something from the keyboard input.

Check out the source code of I2C master and slave to understand how this operation works. Also, as an exercise, you can emulate the slave select functionality that I showed earlier in SPI, to select the slave to which the data will be sent. I encourage you to try this out and then you will have a better hang of I2C programming.
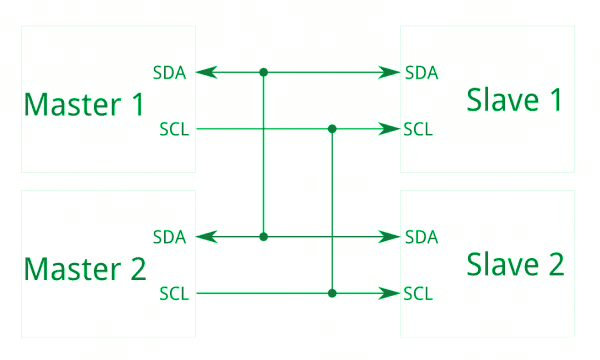
Before signing off, I have a bonus for you. You now know that I2C can be used in a multi- master setup. So how about having two Raspberry Pis configured as I2C masters and receiving data from one Arduino UNO configured as a slave.
With this, I have covered all the essential hardware interfaces in Raspberry Pi. Feel free to comment below if you are looking for some help and also please share your experiences or any particular challenges that you might have faced in executing this setup. I will be back soon with some more interesting demos with Raspberry Pi. Till then, Happy Hardware Hacking.
Disclosure: * Denotes an affiliate link – if you click and make a purchase we may receive a small commission.

Fantastic! I’ve done a bunch of I2C on Arduino, and want to build a small project with an Arduino Micro to directly control some critical timing, while feeding medium level status back to a Pi that will present exercise some logic about event sequences and then present stuff on a web page.
These are EXACTLY the examples I need to head off in my stated direction, and all without a bunch of extra fluff.
THANK YOU.
You are welcome.
How would I receive data from a simple I2c chip and implement data that into python?
Correct me if I’m wrong but it looks like you connect the GPIOs on the RPi to 5V which could potentially be damaging to the device. From the RPi documentation “Connection of a GPIO to a voltage higher than 3.3V will likely destroy the GPIO block within the SoC.” Source: https://www.raspberrypi.org/documentation/hardware/raspberrypi/gpio/README.md
It’s very help-ful information. Please upload source code in I2C