A quick and simple live object detection on a computer with webcam using the OpenVINO toolkit that allows developers to deploy pre-trained deep learning models through a high-level C++ Inference Engine API integrated with application logic.
This tutorial was originally published in OpenVINO.
This tutorial is also available as a Jupyter notebook that can be cloned directly from GitHub. See the installation guide for instructions to run this tutorial locally on Windows, Linux or macOS.
This notebook demonstrates live object detection with OpenVINO. We use the SSDLite MobileNetV2 from Open Model Zoo. At the bottom of this notebook, you will see live inference results from your webcam. You can also upload a video file.
Note: To use this notebook with a webcam, you need to run the notebook on a computer with a webcam. If you run the notebook on a server, the webcam will not work. You can still do inference on a video.
Imports
import collections
import os
import sys
import time

import cv2
import numpy as np
from IPython import display
from openvino.inference_engine import IECore

sys.path.append("../utils")
import notebook_utils as utils
The Model
Download the Model
We use omz_downloader, which is a command-line tool from the openvino-dev package. omz_downloader automatically creates a directory structure and downloads the selected model. This step is skipped if the model is already downloaded. The selected model comes from the public directory, which means it must be converted into Intermediate Representation (IR).
If you want to download another model (ssdlite_mobilenet_v2, ssd_mobilenet_v1_coco, ssd_mobilenet_v2_coco, ssd_resnet50_v1_fpn_coco, ssd_mobilenet_v1_fpn_coco) , please change the model name. Note: Using a model outside the list can require different pre- and post-processing.
# directory where model will be downloaded
base_model_dir = "model"

# model name as named in Open Model Zoo
model_name = "ssdlite_mobilenet_v2"

download_command = f"omz_downloader "
                   f"--name {model_name} "
                   f"--output_dir {base_model_dir} "
                   f"--cache_dir {base_model_dir}"
! $download_command
################|| Downloading ssdlite_mobilenet_v2 ||################

========== Downloading model/public/ssdlite_mobilenet_v2/ssdlite_mobilenet_v2_coco_2018_05_09.tar.gz


========== Unpacking model/public/ssdlite_mobilenet_v2/ssdlite_mobilenet_v2_coco_2018_05_09.tar.gz
Convert the Model
The pre-trained model is in TensorFlow format. To use it with OpenVINO, we need to convert it to OpenVINO IR format. To do this, we use Model Converter (omz_converter), which is another command-line tool from the openvino-dev package. If we don’t specify a precision, the model will be converted many times to all available precisions (FP32 and FP16 in this case). Every conversion should take up to 2 minutes. If the model has been already converted, this step is skipped. Note: Each model may have different precisions available
precision = "FP16"

# output path for the conversion
converted_model_path = f"model/public/{model_name}/{precision}/{model_name}.xml"

if not os.path.exists(converted_model_path):
    convert_command = f"omz_converter "
                      f"--name {model_name} "
                      f"--download_dir {base_model_dir} "
                      f"--precisions {precision}"
    ! $convert_command
========== Converting ssdlite_mobilenet_v2 to IR (FP16)
Conversion command: /opt/hostedtoolcache/Python/3.8.12/x64/bin/python -m mo --framework=tf --data_type=FP16 --output_dir=model/public/ssdlite_mobilenet_v2/FP16 --model_name=ssdlite_mobilenet_v2 --reverse_input_channels '--input_shape=[1,300,300,3]' --input=image_tensor --output=detection_scores,detection_boxes,num_detections --transformations_config=/opt/hostedtoolcache/Python/3.8.12/x64/lib/python3.8/site-packages/mo/extensions/front/tf/ssd_v2_support.json --tensorflow_object_detection_api_pipeline_config=model/public/ssdlite_mobilenet_v2/ssdlite_mobilenet_v2_coco_2018_05_09/pipeline.config --input_model=model/public/ssdlite_mobilenet_v2/ssdlite_mobilenet_v2_coco_2018_05_09/frozen_inference_graph.pb

Model Optimizer arguments:
Common parameters:
    - Path to the Input Model:  /home/runner/work/openvino_notebooks/openvino_notebooks/notebooks/401-object-detection-webcam/model/public/ssdlite_mobilenet_v2/ssdlite_mobilenet_v2_coco_2018_05_09/frozen_inference_graph.pb
    - Path for generated IR:    /home/runner/work/openvino_notebooks/openvino_notebooks/notebooks/401-object-detection-webcam/model/public/ssdlite_mobilenet_v2/FP16
    - IR output name:   ssdlite_mobilenet_v2
    - Log level:    ERROR
    - Batch:    Not specified, inherited from the model
    - Input layers:     image_tensor
    - Output layers:    detection_scores,detection_boxes,num_detections
    - Input shapes:     [1,300,300,3]
    - Mean values:  Not specified
    - Scale values:     Not specified
    - Scale factor:     Not specified
    - Precision of IR:  FP16
    - Enable fusing:    True
    - Enable grouped convolutions fusing:   True
    - Move mean values to preprocess section:   None
    - Reverse input channels:   True
TensorFlow specific parameters:
    - Input model in text protobuf format:  False
    - Path to model dump for TensorBoard:   None
    - List of shared libraries with TensorFlow custom layers implementation:    None
    - Update the configuration file with input/output node names:   None
    - Use configuration file used to generate the model with Object Detection API:  /home/runner/work/openvino_notebooks/openvino_notebooks/notebooks/401-object-detection-webcam/model/public/ssdlite_mobilenet_v2/ssdlite_mobilenet_v2_coco_2018_05_09/pipeline.config
    - Use the config file:  None
    - Inference Engine found in:    /opt/hostedtoolcache/Python/3.8.12/x64/lib/python3.8/site-packages/openvino
Inference Engine version:   2021.4.2-3976-0943ed67223-refs/pull/539/head
Model Optimizer version:    2021.4.2-3976-0943ed67223-refs/pull/539/head
2021-12-23 00:27:18.543081: W tensorflow/stream_executor/platform/default/dso_loader.cc:60] Could not load dynamic library 'libcudart.so.11.0'; dlerror: libcudart.so.11.0: cannot open shared object file: No such file or directory; LD_LIBRARY_PATH: /opt/hostedtoolcache/Python/3.8.12/x64/lib/python3.8/site-packages/cv2/../../lib64:
2021-12-23 00:27:18.543126: I tensorflow/stream_executor/cuda/cudart_stub.cc:29] Ignore above cudart dlerror if you do not have a GPU set up on your machine.
/opt/hostedtoolcache/Python/3.8.12/x64/lib/python3.8/site-packages/tensorflow/python/autograph/impl/api.py:22: DeprecationWarning: the imp module is deprecated in favour of importlib; see the module's documentation for alternative uses
  import imp
The Preprocessor block has been removed. Only nodes performing mean value subtraction and scaling (if applicable) are kept.
[ SUCCESS ] Generated IR version 10 model.
[ SUCCESS ] XML file: /home/runner/work/openvino_notebooks/openvino_notebooks/notebooks/401-object-detection-webcam/model/public/ssdlite_mobilenet_v2/FP16/ssdlite_mobilenet_v2.xml
[ SUCCESS ] BIN file: /home/runner/work/openvino_notebooks/openvino_notebooks/notebooks/401-object-detection-webcam/model/public/ssdlite_mobilenet_v2/FP16/ssdlite_mobilenet_v2.bin
[ SUCCESS ] Total execution time: 67.27 seconds.
[ SUCCESS ] Memory consumed: 469 MB.
Load the Model
Downloaded models are located in a fixed structure, which indicates vendor (intel or public), model name and precision.
Only a few lines of code are required to run the model. First, we create an Inference Engine. Then we read the network architecture and model weights from the .bin and .xml files to load onto the desired device. If you choose GPU you need to wait for a while, as the startup time is much longer than in the case of CPU.
There is a possibility to allow OpenVINO to decide which hardware offers the best performance. In that case, just use AUTO. Remember that for most cases the best hardware is GPU (better performance, but longer startup time).
# initialize inference engine
ie_core = IECore()
# read the network and corresponding weights from file
net = ie_core.read_network(model=converted_model_path)
# load the model on the CPU (you can choose manually CPU, GPU, MYRIAD etc.)
# or let the engine choose best available device (AUTO)
exec_net = ie_core.load_network(network=net, device_name="CPU")

# get input and output names of nodes
input_key = list(exec_net.input_info)[0]
output_key = list(exec_net.outputs.keys())[0]

# get input size
height, width = exec_net.input_info[input_key].tensor_desc.dims[2:]
Input key and output key are the names of the input node and output node respectively. In the case of the SSDLite MobileNetV2, we have one input and one output.
('image_tensor', 'DetectionOutput')
Processing
Process Results
Firstly, we list all available classes and create colors for them. Then, in the post-process stage, we transform boxes with normalized coordinates [0, 1] into boxes with pixel coordinates [0, image_size_in_px]. Afterward, we use non-maximum suppression to reject overlapping detections and those below the probability threshold (0.5). Finally, we draw boxes and labels inside them.
# https://tech.amikelive.com/node-718/what-object-categories-labels-are-in-coco-dataset/
classes = [
    "background", "person", "bicycle", "car", "motorcycle", "airplane", "bus", "train",
    "truck", "boat", "traffic light", "fire hydrant", "street sign", "stop sign",
    "parking meter", "bench", "bird", "cat", "dog", "horse", "sheep", "cow", "elephant",
    "bear", "zebra", "giraffe", "hat", "backpack", "umbrella", "shoe", "eye glasses",
    "handbag", "tie", "suitcase", "frisbee", "skis", "snowboard", "sports ball", "kite",
    "baseball bat", "baseball glove", "skateboard", "surfboard", "tennis racket", "bottle",
    "plate", "wine glass", "cup", "fork", "knife", "spoon", "bowl", "banana", "apple",
    "sandwich", "orange", "broccoli", "carrot", "hot dog", "pizza", "donut", "cake", "chair",
    "couch", "potted plant", "bed", "mirror", "dining table", "window", "desk", "toilet",
    "door", "tv", "laptop", "mouse", "remote", "keyboard", "cell phone", "microwave", "oven",
    "toaster", "sink", "refrigerator", "blender", "book", "clock", "vase", "scissors",
    "teddy bear", "hair drier", "toothbrush", "hair brush"
]


# colors for above classes (Rainbow Color Map)
colors = cv2.applyColorMap(
    src=np.arange(0, 255, 255 / len(classes), dtype=np.float32).astype(np.uint8),
    colormap=cv2.COLORMAP_RAINBOW
).squeeze()


def process_results(frame, results, thresh=0.6):
    # size of the original frame
    h, w = frame.shape[:2]
    # results is a tensor [1, 1, 100, 7]
    results = results[output_key][0][0]
    boxes = []
    labels = []
    scores = []
    for _, label, score, xmin, ymin, xmax, ymax in results:
        # create a box with pixels coordinates from the box with normalized coordinates [0,1]
        boxes.append(tuple(map(int, (xmin * w, ymin * h, xmax * w, ymax * h))))
        labels.append(int(label))
        scores.append(float(score))

    # apply non-maximum suppression to get rid of many overlapping entities
    # see https://paperswithcode.com/method/non-maximum-suppression
    # this algorithm returns indices of objects to keep
    indices = cv2.dnn.NMSBoxes(bboxes=boxes, scores=scores, score_threshold=thresh, nms_threshold=0.6)

    # if there are no boxes
    if len(indices) == 0:
        return []

    # filter detected objects
    return [(labels[idx], scores[idx], boxes[idx]) for idx in indices.flatten()]


def draw_boxes(frame, boxes):
    for label, score, box in boxes:
        # choose color for the label
        color = tuple(map(int, colors[label]))
        # draw box
        cv2.rectangle(img=frame, pt1=box[:2], pt2=box[2:], color=color, thickness=3)
        # draw label name inside the box
        cv2.putText(img=frame, text=f"{classes[label]}", org=(box[0] + 10, box[1] + 30),
                    fontFace=cv2.FONT_HERSHEY_COMPLEX, fontScale=frame.shape[1] / 1000, color=color,
                    thickness=1, lineType=cv2.LINE_AA)

    return frame
Main Processing Function
Run object detection on the specified source. Either a webcam or a video file.
# main processing function to run object detection
def run_object_detection(source=0, flip=False, use_popup=False):
# create video player to play with target fps
player = utils.VideoPlayer(source=source, flip=flip, fps=30)
# start capturing
player.start()
try:
if use_popup:
title = "Press ESC to Exit"
cv2.namedWindow(winname=title, flags=cv2.WINDOW_GUI_NORMAL | cv2.WINDOW_AUTOSIZE)
processing_times = collections.deque()
while True:
# grab the frame
frame = player.next()
if frame is None:
print("Source ended")
break
# if frame larger than full HD, reduce size to improve the performance
scale = 1280 / max(frame.shape)
if scale < 1:
frame = cv2.resize(src=frame, dsize=None, fx=scale, fy=scale,
interpolation=cv2.INTER_AREA)
# resize image and change dims to fit neural network input
input_img = cv2.resize(src=frame, dsize=(width, height), interpolation=cv2.INTER_AREA)
# create batch of images (size = 1)
input_img = input_img.transpose(2, 0, 1)[np.newaxis, ...]
# measure processing time
start_time = time.time()
# get results
results = exec_net.infer(inputs={input_key: input_img})
stop_time = time.time()
# get poses from network results
boxes = process_results(frame=frame, results=results)
# draw boxes on a frame
frame = draw_boxes(frame=frame, boxes=boxes)
processing_times.append(stop_time - start_time)
# use processing times from last 200 frames
if len(processing_times) > 200:
processing_times.popleft()
_, f_width = frame.shape[:2]
# mean processing time [ms]
processing_time = np.mean(processing_times) * 1000
fps = 1000 / processing_time
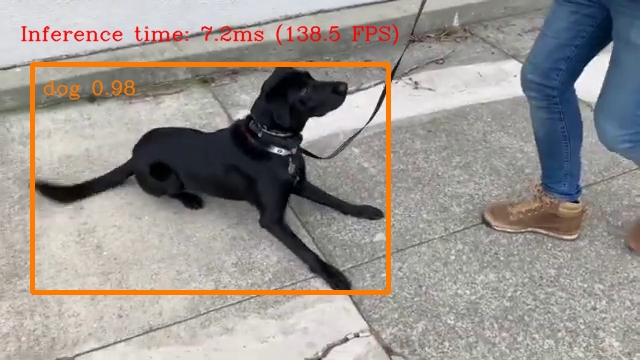
cv2.putText(img=frame, text=f"Inference time: {processing_time:.1f}ms ({fps:.1f} FPS)", org=(20, 40),
fontFace=cv2.FONT_HERSHEY_COMPLEX, fontScale=f_width / 1000,
color=(0, 0, 255), thickness=1, lineType=cv2.LINE_AA)
# use this workaround if there is flickering
if use_popup:
cv2.imshow(winname=title, mat=frame)
key = cv2.waitKey(1)
# escape = 27
if key == 27:
break
else:
# encode numpy array to jpg
_, encoded_img = cv2.imencode(ext=".jpg", img=frame,
params=[cv2.IMWRITE_JPEG_QUALITY, 100])
# create IPython image
i = display.Image(data=encoded_img)
# display the image in this notebook
display.clear_output(wait=True)
display.display(i)
# ctrl-c
except KeyboardInterrupt:
print("Interrupted")
# any different error
except RuntimeError as e:
print(e)
finally:
# stop capturing
player.stop()
if use_popup:
cv2.destroyAllWindows()
Run
Run Live Object Detection
Run using a webcam as the video input. By default, the primary webcam is set with source=0. If you have multiple webcams, each one will be assigned a consecutive number starting at 0. Set flip=True when using a front-facing camera. Some web browsers, especially Mozilla Firefox, may cause flickering. If you experience flickering, set use_popup=True. Note popup mode may not work if you run this notebook on a remote computer.
run_object_detection(source=0, flip=True, use_popup=False)
Cannot open camera 0
Source ended
Run Object Detection on a Video File
If you don’t have a webcam, you can still run this demo with a video file. Any format supported by OpenCV will work (see: https://docs.opencv.org/4.5.1/dd/d43/tutorial_py_video_display.html).
video_file = "../201-vision-monodepth/data/Coco Walking in Berkeley.mp4"

run_object_detection(source=video_file, flip=False, use_popup=False)