
Dolby.io aims to deliver the best experience for real-time communication apps via the Spatial Audio capability in the Dolby.io Communications APIs. This is one of the recent step to make your end user’s experience better. This allows you to place conference participants in a 3D rendered audio scene and hear the participants from the given locations.
This post was originally published in Dolby.io.
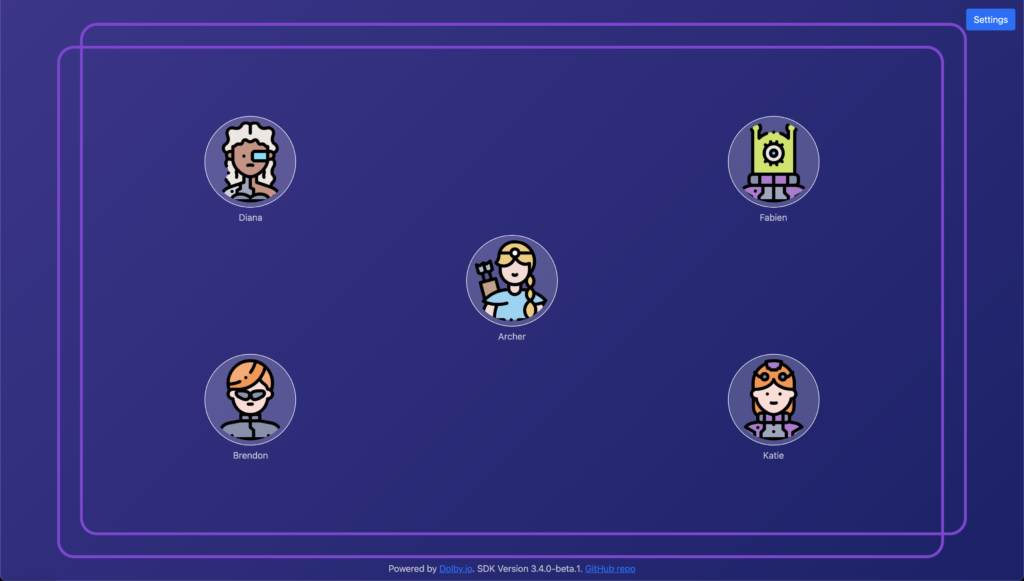
To learn more about this feature and everything you can do with it, check out our documentation. In this post I want to guide you, step by step, to take an existing web / JavaScript application, and turn on Spatial Audio. We are going to take an existing application, available on GitHub and enable Spatial Audio in a few simple steps. This is what the layout looks like; the participants are already placed around the local user in a pyramid type of formation. Once everybody joins the conference, when someone speaks, the spatial audio rendering will make it easier for your brain to find where the user’s video tile is located on the layout based on where the sound comes from. It also makes conversations more engaging.
The avatar images are made by photo3idea_studio and Freepik from www.flaticon.com.
Before we get started, request your access to this Closed Beta program at https://go.dolby.io/spatial-audio.
Get the source code of this sample application in the original folder and let’s get started. I wanted to make this web application as simple as possible so I decided to use some very traditional JavaScript frameworks, such as Jquery and Bootstrap, to avoid having to write too much CSS and JavaScript. I am also using Express to run a local web server.
The application is really simple. As people connect to the same conference, they are placed around the local participant. When someone speaks, the circle will illuminate around the avatar or video and the sound will come out from that position on the web page.
The sample application contains the following files:
- index.html – web page that you need to use to display the application
- styles.css – some simple styles for the application.
- actions.js – JavaScript used for actions such as turning on and off the camera or muting and unmuting the microphone
- videos.js – JavaScript that contains the event handlers for the video streams
- utils.js – Javascript that contains some utility functions
- server.js – Node.JS application that will start a small web server to deliver the web application locally
Follow the Getting Started guide for JavaScript if you are new to our platform.
First Run of the Sample Application
Let’s start by running the current application without Spatial Audio. Since we are using Express to create a local web server, you first must install the package dependencies by running the command:
npm install
Create a file called .env in your application folder and set the consumer key and secret from your Dolby.io dashboard.
CONSUMER_KEY=<YOUR_CONSUMER_KEY_HERE>
CONSUMER_SECRET=<YOUR_CONSUMER_SECRET_HERE>
Run the web server using the npm command:
npm run start
Then you can access the application at https://localhost:8081
Initialization of Spatial Audio
Now that the application is running, to enable the Spatial Audio rendering, the very first action you need to do is to set the spatialAudio flag to true when joining the conference. We are going to work only in the file scripts.js.
const joinOptions = {
    constraints: {
        audio: true,
        video: true,
    },
    spatialAudio: true, // STEP 1 - Turn on Spatial Audio
};
Hint: Look for the following comment in the code to locate the joinOptions object:
// STEP 1 - Turn on Spatial Audio
Next, we need to describe how we want to define the spatial scene. In this function, we are going to consider the top left corner of the window as the origin point with coordinates { x: 0, y: 0, z: 0 }. As we move to the right our x will increase and as we move down our y will increase.
const setSpatialEnvironment = () => {
    // document.documentElement.clientWidth and document.documentElement.clientHeight give me the dimensions of the web page
    const scale   = { x: document.documentElement.clientWidth / 4, y: document.documentElement.clientHeight / 3, z: 1 };
    const forward = { x: 0, y: -1, z: 0 };
    const up      = { x: 0, y: 0,  z: 1 };
    const right   = { x: 1, y: 0,  z: 0 };

    VoxeetSDK.conference.setSpatialEnvironment(scale, forward, up, right);
};
Hint: Look for the following comment in the code to locate where to add this function:
// STEP 2 - Function to set the environment
Make sure to call this function right after joining the conference:
// Join the conference
await VoxeetSDK.conference.join(conference, joinOptions);

// Set the spatial audio scene
setSpatialEnvironment();
Hint: Look for the following comment in the code to locate the join function:
// STEP 3 - Set the spatial audio scene
Placing Users in the Spatial Scene
In our sample application, each user is placed on the web page inside a div with the css class video-container and has a data attribute data-participant-id to make it easier to look for the location of that particular user. For that operation, we create a function setSpatialPosition that takes a participant object as parameter. We look for the DOM element that hosts that participant and gets the location of the DOM element on the page, and then tells the SDK to place that participant in the center of the DOM element.
const setSpatialPosition = (participant) => {
    // Look for the participant element
    const videoContainer = $(`[data-participant-id="${participant.id}"]`);
    if (!videoContainer.length) return;

    // Get the position of the UI element
    const elementPosition = videoContainer[0].getBoundingClientRect();

    // Get the position of the center of the UI element
    const spatialPosition = {
        x: elementPosition.x + (elementPosition.width / 2),
        y: elementPosition.y + (elementPosition.height / 2),
        z: 0,
    };

    VoxeetSDK.conference.setSpatialPosition(participant, spatialPosition);
};
Hint: Look for the following comment in the code to locate where to add this function:
// STEP 4 - Function to set the spatial placement for a user
On the participantUpdated event of the VoxeetSDK.conference object, when the user is connected, place that participant on the spatial scene. The participant will be muted by default until you place the participant in the audio scene.
if (isConnected(participant)) {
    $(`.user-container[data-external-id="${participant.info.externalId}"] .participant-name`).html(participant.info.name);
    setSpatialPosition(participant);
}
Hint: Look for the following comment in the code to locate the participantUpdated event:
// STEP 5 - Set the spatial placement for the user
Listen to the Window Resize Event
When the end user resizes the window, the position of each UI element is changed so we have to listen to the event resize of the window object. Add the following code after joining the conference:
// Listen to the resize event
window.addEventListener('resize', onWindowResize);
Hint: Look for the following comment in the code to locate the join function:
// STEP 6 - Listen to the resize event
We need to write the function onWindowResize triggered on the resize event. Keep in mind that when resizing the window, the event will trigger A LOT. To prevent the function from triggering too often, we will use a mechanism with setTimeout and a “lock” to prevent the function to trigger more than once per second. In this function, we want to reset the dimensions of the spatial audio scene. Since the UI element that represents the local participant is at the center of the page, we need to move that participant to the center of the newly resized window. Then, because all the participants UI elements have moved, we need to call the setSpatialPosition for all of them.
var lockResizeEvent = false;

/**
 * Triggered when resizing the window.
 * The event will be processed with a maximum rate of once per second.
 */
const onWindowResize = () => {
    // Make sure the event processing is not "locked"
    if (lockResizeEvent) return;
    lockResizeEvent = true;

    // Use the setTimeout to wait a second before we process the resize event
    setTimeout(() => {
        lockResizeEvent = false;

        // Re-set the spatial audio scene dimensions
        setSpatialEnvironment();

        // Since the local participant UI element is at the center of the screen,
        // we need to update its position based on the new window size
        const localParticipant = $(`.user-container[data-participant-id="${VoxeetSDK.session.participant.id}"]`);
        if (localParticipant.length) {
            // Get the dimensions of the rectangle
            const clientRect = localParticipant[0].getBoundingClientRect();

            // Set the local participant at the center
            const top = (document.documentElement.clientHeight - clientRect.height ) / 2;
            const left = (document.documentElement.clientWidth - clientRect.width ) / 2;

            // Animate the UI element to its new position
            localParticipant.animate({ top: `${top}px`, left: `${left}px` }, 500);
        }

        // Now, for each participant, we need to update the spatial position
        [...VoxeetSDK.conference.participants].map((val) => {
            setSpatialPosition(val[1]);
        });
    }, 1000);
};
Hint: Look for the following comment in the code to locate where to add this function:
// STEP 7 - Handle the window resize event
You can find the completed version of this blog post in the final folder.
Deploy Application
To invite someone to your conference and experience Spatial Audio, you can use a service such as ngrok to create a public URL from your local machine, or you can deploy the application on a cloud service and share the link.
Next step
In conclusion, I invite you to sign up for our Closed Beta program at https://go.dolby.io/spatial-audio to access this Spatial Audio capability.
