
You might wonder why I’m writing a Node.js tutorial blog which is already available in plenty.There’s no shortage of Node.js tutorials out there, but most of them cover specific use cases or topics that only apply when you’ve already got Node up and running. As a beginner, I’ve learned about Node.js that I thought I’d share. Nothing in here is hard, and you’ve got a fighting chance of getting this right on your own with no help from me, but I did learn a few things the hard way and felt I should share them.
Let me introduce myself first. I’m Aravind, IoT Application developer and I’m completely new to this Node.js world, I started with Node.js for creating a dashboard application which provides monitoring of sensor data and data visualization. When I started, I found lots of information about Node.js, but it can be difficult for beginners to find good, step-by-step information on how to get started. So I planned to compile all my study works into a blog series where it will be useful for any beginners to kickstart with Node.js to build a complete web application step by step.
This tutorial series covers:
- Getting started with Node.js (This post)
- Getting started with Express.js
- How to make AJAX requests using Node/Express.js
- Simple Express application with Cassandra database along with session handling
- Creating REST API using Node/Express.js with Cassandra database
- Node/Express.js application over HTTPS
- Node application with NGINX
This tutorial series answers the questions that can bog down a typical newbie developer and explains how to get started from the very beginning. This is the first post of this series that will help you get a jumpstart with Node.js setup. If you are not a complete noob in Node.js, then the RisingStack blog might serve your weekly dose of Node.js tips and tricks. These guys are absolute Node.js lovers and the blog has a lot of practical tips on deploying Node.js applications.
Note: We have used Ubuntu as the OS platform for building the demos for this tutorial series. It is also assumed that you are well aware of JavaScript and are familiar with basic terminologies related to Node.js such as node modules, events, callbacks and tools such as npm. We will straightaway get into DIY mode so that we start writing some code and build some apps instead of meandering with the theory and concepts.
Introduction to Node.js
Node markets itself as an asynchronous, event-driven framework built on top of Chrome’s JavaScript engine and designed for creating scalable network applications. It’s basically JavaScript plus a bunch of C/C++ under the hood for things like interacting with the filesystem, starting up HTTP or TCP servers and so on.
Node is single-threaded and uses a concurrency model based on an event loop. It is non-blocking, so it doesn’t make the program wait, but instead it registers a callback and lets the program continue. This means it can handle concurrent operations without multiple threads of execution, so it can scale pretty well.
Installing Node.js Ubuntu Package Manager
Click here to get the official document for latest stable version of node:
To install Node.js, type the following command in your terminal:
curl -sL https://deb.nodesource.com/setup_7.x | sudo -E bash -
sudo apt-get install -y nodejs
Then install the Node package manager, npm:
sudo apt-get install npm
Create a symbolic link for node, as many Node.js tools use this name to execute.
sudo ln -s /usr/bin/nodejs /usr/bin/node
Now we should have both the Node and npm commands working:
$ node -v
v7.0.0
$ npm -v
v3.10.8
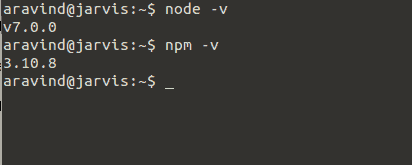
Now we have installed Node.js and npm in our ubuntu system. Version 7.0.0 is what we are using here but if you are close to this version number then that is ok.
Node.js Fundamentals
I am assuming that you do have some fundamental idea about Node.js. For example, you should be aware of the basic concepts such as
- Modules
- Events
- Callbacks
- Stream
- Error handling
For a detailed explanation, refer the official documentation here.
Our first Node.js app
The most basic application of Node.js is a web server which serves web clients. Let’s see the steps in building a web server and client app using Node.js.
- Loading the required modules
- Create a server
- Initialize request and response
- Creating a custom web server and client app using Node
Step 1 : Loading the required modules
In order to use a module installed through npm, you first need to import it using require() function as shown below.
var module = require(“module_name”);
As per above syntax, specify the module name in the require() function. The require() function will return an object, function, property or any other JavaScript type, depending on what the specified module returns.The following example demonstrates how to use Node ‘http’ module.
var http = require(“http”);
Step 2 : Creating a server
We use the created http instance and call http.createServer() method to create a server instance and then we bind it at port 3000 using the listen method associated with the server instance. Pass it as a function with parameters request and response.
[code language=”javascript”]http.createServer(function (request, response) {
response.end(‘Hello World\n’);
}).listen(3000);[/code]
The above code is enough to create an HTTP server which listens, i.e., waits for a request over 3000 port on the local machine. With this, we have a rudimentary web server ready for use.
Step 3 : Initialize request and response
Combine the above two steps and execute the application file (let’s call it, server.js)
[code language=”javascript”]var http = require(“http”);
http.createServer(function (req, res) {
res.end(‘Hello World\n’);
}).listen(3000);
console.log(‘Server running at http://127.0.0.1:3000/’);[/code]
To execute the web server, run node server.js in a terminal. You’ll find the following message,
Server running at http://127.0.0.1:3000/
in your terminal console.
And if you try to send a request to the web server from the browser then check the output in your browser.
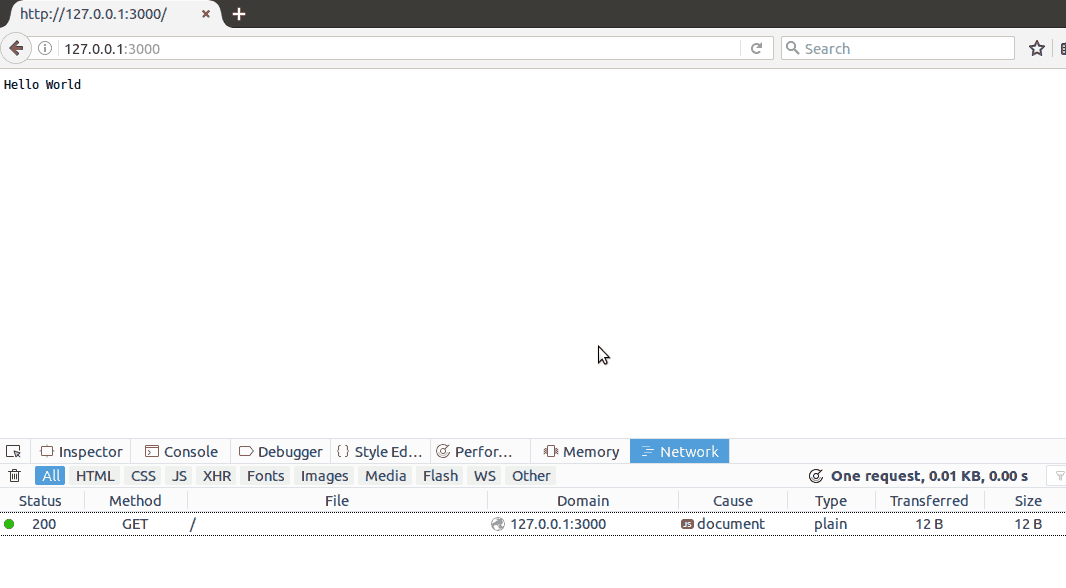
Thus we now have created a basic web application powered by Node.js.
Step 4 : Creating custom web server and client app using Node
Let’s modify our server code to fetch files from our file system and create a http client application for the server. This http client application is a separate Node.js program that interacts with the server in place of the browser.
Here is the modified server.js code
[code language=”javascript”]var http = require(‘http’);
var fs = require(‘fs’);
var url = require(‘url’);
// Create a server
http.createServer( function (request, response) {
// Parse the request containing file name
var pathname = url.parse(request.url).pathname;
// Print the name of the file for which request is made.
console.log("Request for " + pathname + " received.");
// Read the requested file content from file system
fs.readFile(pathname.substr(1), function (err, data) {
if (err) {
console.log(err);
// HTTP Status: 404 : NOT FOUND
response.writeHead(404, {‘Content-Type’: ‘text/html’});
}else {
// HTTP Status: 200 : OK
response.writeHead(200, {‘Content-Type’: ‘text/html’});
// Write the content of the file to response body
response.write(data.toString());
}
// Send the response body
response.end();
});
}).listen(3000);
// Console will print the message
console.log(‘Server running at http://127.0.0.1:3000/’);[/code]
Now we have created our server.js which handles client requests. Now we’ll create our index.html file in the same project directory as server.js. This is the HTML file that will be served to the client app.
[code language=”html”]<html>
<head>
<title>Client html page</title>
</head>
<body>
<h1>Hi there !!! <small>Welcome</small></h1>
</body>
</html>[/code]
Now we’ll write our client.js file which will receive the html response from server and display it in the console.
[code language=”javascript”]var http = require(‘http’);
// Options to be used by request
var options = {
  host: ‘localhost’,
  port: ‘3000’,
  path: ‘/index.html’
};
// Callback function is used to deal with response
var callback = function(response){
// Continuously update stream with data
var body = ‘ ‘;
response.on(‘data’, function(data) {
body += data;
});
response.on(‘end’, function() {
// Data received completely.
console.log(body);
});
}
// Make a request to the server
var req = http.request(options, callback);
req.end();[/code]
Open a terminal window and run the server.js ,which will start the web server. Subsequent to this, open another terminal window and run the client.js script.
The server’s terminal window will show up like this.
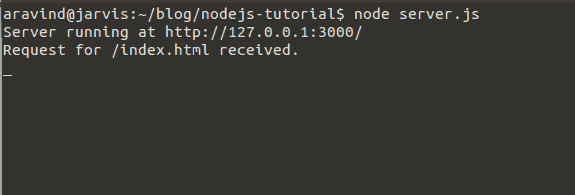
The last line “Request for /index.html received”, is only displayed after the server receives a request from the client.
When the client.js is run, it sends a request to server and the server provides a response to the request received from the client. At that point, the client terminal window will look like this.
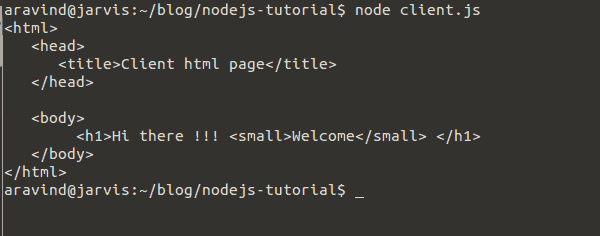
Here index.html page is served by the server when the URL “http://localhost:3000/index.html” is requested. This is the same html file that we placed in the server’s directory alongside server.js.
If you following along till this point and you see the same output in your server and client terminals then you have made it. Congratulations ! and you are now destined for greater achievements in the Node.js adventure world.
Summary
Node.js is an extremely powerful and flexible technology that can solve a wide variety of problems. This tutorial was just to bridge the gap between downloading Node.js and building your first Node app which could do some stuff. But there are more possibilities. With the modules available in npm repository, you can build more complex and compelling applications. So in continuation of our Node.js journey, in the next post, I will show you how to integrate Express framework in our Node.js application. Till then, stay tuned.
